概述
本章,您将在 Nginx 中学习并配置虚拟主机。
虚拟主机:也称共享主机,指把一台物理服务器通过管理面板(如 cPanel、Plesk 等面板)在操作系统层面隔离出多个账户,每个账户有独立的文件系统、数据库等,但共享 CPU、内存、带宽等资源。通常而言,虚拟主机都预装了网站运行的必需环境以及数据库,站长直接上传网站的相关内容即可,较适合那些初级用户搭建网站的需求。
VPS(Virtual Private Server,虚拟专有服务器):指把一台物理服务器通过虚拟化技术(如 KVM/OpenVZ 等)在操作系统层面隔离出多个操作系统,每个操作系统独享隔离出的 CPU、内存、带宽等资源。通常而言,VPS 在稳定性上比虚拟主机高,但是其存在不可扩容(部分厂商也支持有限升级的扩容)以及受限于单台物理服务器故障的问题。
云服务器:基于分布式架构的弹性计算服务,支持自动故障迁移、多副本存储与按秒计费,其架构已超越传统 VPS 的单机范式,成为企业级云原生应用的基础设施标准,可用性达 99% 以上。云服务器在不同厂商中所定义的名称不同,如:
- 阿里云 - ECS(Elastic Compute Service)
- 腾讯云 - CVM(Cloud Virtual Machine)
- 华为云 - ECS(Elastic Cloud Server)
- 百度智能云 - BCC(Baidu Cloud Compute)
- 亚马逊 - EC2(Elastic Compute Cloud)
- Microsoft Azure - Virtual Machine
- 京东云 - Cloud Virtual Machine
虚拟主机分类
有三大分类:
- 基于 IP 地址的虚拟主机 - 为 Web 服务器配置多个IP 地址,每个网站绑定一个独立 IP 地址。当用户访问不同 IP 地址时,Web 服务器根据目标 IP 地址将请求分发到对应的网站目录
- 基于端口的虚拟主机 - Web 服务器使用同一 IP 地址,但通过不同端口号区分网站。例如,80 端口提供给站点 A,90 端口给提供站点 B
- 基于域名的虚拟主机 - 所有网站共享同一 IP 地址和端口(通常是 80 或 443),Web 服务器通过解析 HTTP 请求头中的 Host 字段(如 Host: www.sitea.com)来识别目标域名,并将请求分发到对应的网站目录
对比如下:
| 类型 | 区分方式 | IP 地址需求 | 端口需求 | 主流程度 | 典型场景 |
|---|---|---|---|---|---|
| 基于 IP | 不同 IP 地址 | 多个 | 相同 | 低(历史遗留) | 早期 SSL 站点、特殊兼容需求 |
| 基于端口 | 不同端口号 | 单个 | 多个 | 低(内部使用) | 开发测试、内部管理系统 |
| 基于域名 | HTTP Host请求头 | 单个 | 相同 | 高(95% 以上) | 所有常规网站、共享主机 |
基于域名的虚拟主机演示
- games.com 域 - 主机名为 www,网页根目录为 /html/games/
- takes.com 域 - 主机名为 www,网页根目录为 /html/takes/
创建网页目录:
Shell > mkdir /html/ && mkdir /html/{games,takes}将内容写入到索引文件中:
Shell > echo "This is the GAMES page" >> /html/games/index.html

Shell > echo "TAKAS" >> /html/takes/index.html
修改主配置文件 nginx.conf,最终的文件内容如下:
Shell > cat /usr/local/nginx/conf/nginx.conf
user  nginx;
worker_processes  4;

error_log  logs/error.log  error;

pid        logs/nginx.pid;

worker_rlimit_nofile 7400;

events {
    use epoll;
    worker_connections  1024;
    multi_accept on;
}

http {
    include       mime.types;
    default_type  application/octet-stream;

    log_format  main  '$remote_addr - $remote_user [$time_local] "$request" '
                      '$status $body_bytes_sent "$http_referer" '
                      '"$http_user_agent" "$http_x_forwarded_for"';

    sendfile       on;
    tcp_nopush     on;

    keepalive_timeout  30;

    server {
        listen  192.168.100.20:80;
        server_name  www.games.com;
        access_log  logs/games-access.log  main;
        charset utf-8;

        location / {
            root   /html/games/;
            index  index.html index.htm;
        }
    }

    server {
        listen 192.168.100.20:80;
        server_name  www.takes.com;
        access_log  logs/takes-access.log  main;
        charset utf-8;

        location / {
            root   /html/takes/;
            index  index.html index.htm;
        }
    }
}
语法检测与启动:
Shell > /usr/local/nginx/sbin/nginx -t && /usr/local/nginx/sbin/nginx由于是演示环境,这里直接修改 Windows 操作系统的 hosts 文件(C:\Windows\System32\drivers\etc\hosts),省去搭建 DNS 的麻烦。将以下两行追加到 hosts 文件中:
192.168.100.20 www.games.com
192.168.100.20 www.takes.com
在 PowerShell 中刷新 DNS 的解析:
PS > ipconfig /flushdns效果如下图:
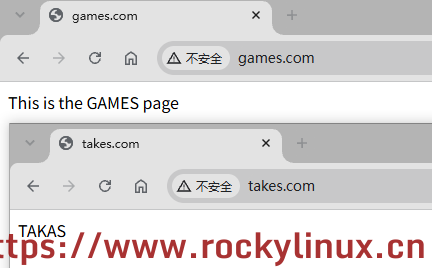
实际情况下,每个虚拟主机:
- 配置两个 server 上下文,一个 server 上下文占用 80 端口(HTTP),另外一个 server 上下文占用 443 端口(HTTPS)
- 重定向的配置(80 跳转到 443)
- 为 HTTPS 配置 TLS/SSL 证书
- 一些额外的性能调整与安全配置
这里将这些步骤都省略掉了。
还原环境
为了后续的功能演示,现将环境进行还原:
- 停止 Nginx -
/usr/local/nginx/sbin/nginx -s quit - 修改 Windows 的 hosts 文件,将追加的两行删除
-
仅保留 www.games.com 关联的内容与配置
Shell > rm -rf /html/takes

Shell > cat /usr/local/nginx/conf/nginx.conf
user  nginx;
worker_processes  4;

error_log  logs/error.log  error;

pid        logs/nginx.pid;

worker_rlimit_nofile 7400;

events {
    use epoll;
    worker_connections  1024;
    multi_accept on;
}

http {
    include       mime.types;
    default_type  application/octet-stream;

    log_format  main  '$remote_addr - $remote_user [$time_local] "$request" '
                      '$status $body_bytes_sent "$http_referer" '
                      '"$http_user_agent" "$http_x_forwarded_for"';

    sendfile       on;
    tcp_nopush     on;

    keepalive_timeout  30;

    server {
        listen  192.168.100.20:80;
        server_name  www.games.com;
        access_log  logs/games-access.log  main;
        charset utf-8;

        location / {
            root   /html/games/;
            index  index.html index.htm;
        }
    }
}
版权声明:「自由转载-保持署名-非商业性使用-禁止演绎 3.0 国际」(CC BY-NC-ND 3.0)

用一杯咖啡支持我们,我们的每一篇[文档]都经过实际操作和精心打磨,而不是简单地从网上复制粘贴。期间投入了大量心血,只为能够真正帮助到您。
暂无评论