
安装 Ansible 后得到什么版本,更多取决于控制节点使用的 Python,而不是输入的安装命令。在默认配置的 Rocky Linux 10 或 Ubuntu 24.04 上,pipx install ansible-core 能无报错完成,却安装了前一条发布分支。文中当前的 ansible-core 不支持在 Python 3.12 上运行,因此 pip 会自动选择仍兼容该解释器的最新版本;如果不检查版本字符串,很容易忽略这一点。
本指南先比较各安装方法实际得到的版本,再介绍 Rocky Linux 10 的 pipx 安装流程:AlmaLinux 10 相同,RHEL 10 则提供不依赖 EPEL 的变体。随后介绍 AppStream 软件包,以及 Ubuntu 上的 apt、PPA 和 uv 选项,并配置 SSH 密钥、ansible.cfg、主机清单、临时命令和包含 Vault 密文的首个剧本。文中的实验于 2026 年 11 月在家庭实验室的三台虚拟机上完成,Rocky Linux 10 控制节点使用 ansible-core 2.22.0;下面的输出均来自该实验环境。
不同安装方法得到的 ansible-core 版本
表中只有两种方法安装了文中最新的 ansible-core,而且都要求控制节点使用 Python 3.13 或更高版本。其他方法得到的版本落后一条或多条发布分支,只要这是有意选择,就没有问题。标注“本次实验”的各行均在 Rocky Linux 10.2 和 Ubuntu 24.04.4 上测试;来自其他指南的两行则单独标明出处。
| 方法 | 控制节点 Python | 实际安装结果 | 依据 |
|---|---|---|---|
pipx install --python python3.14 ansible-core(Rocky 10) |
3.14.8(AppStream) | ansible-core 2.22.0 | 本次实验 |
uv tool install --python 3.14 ansible-core(Ubuntu 24.04) |
3.14.10(由 uv 下载) | ansible-core 2.22.0 | 本次实验 |
pipx install ansible-core(Rocky 10 或 Ubuntu 24.04) |
3.12(系统解释器) | ansible-core 2.21.6 | 本次实验 |
pipx install --python python3.14 --include-deps ansible(Rocky 10) |
3.14.8 | ansible 14.5.0,包含 ansible-core 2.21.6 | 本次实验 |
dnf install ansible-core(Rocky 10 AppStream) |
3.12.15 | ansible-core 2.16.16,不包含集合 | 本次实验 |
dnf install ansible(Rocky 10,已启用 EPEL) |
不适用 | No match for argument(找不到匹配软件包) | 本次实验 |
apt install ansible(Ubuntu 24.04) |
3.12.3 | ansible 9.2.0,包含 ansible-core 2.16.3 | 本次实验 |
ppa:ansible/ansible(Ubuntu 24.04) |
3.12.3 | ansible 14.5.0,包含 ansible-core 2.21.5 | 本次实验检查的候选软件包版本 |
apt install ansible(Ubuntu 26.04) |
系统解释器 | ansible-core 2.20.1 | Ubuntu 26.04 指南 |
apt install ansible(Debian 13) |
系统解释器 | ansible 12.0.0,包含 ansible-core 2.19.11 | Debian 13 指南,2026 年 10 月 |
有两行结果可能出乎意料。完整的 ansible 社区软件包仍锁定前一条 ansible-core 分支,因为实验时该套件的下一主版本在 PyPI 上仍处于 alpha 阶段。因此,此时“安装完整套件”和“安装最新引擎”是两种选择。Rocky Linux 10 的 AppStream 确实提供可用的 ansible-core,只是落后六条发布分支,也不包含集合。如果需要最新引擎和少量集合,可以通过 pipx 安装 ansible-core,再用 ansible-galaxy 添加集合,第 2 步采用的就是这种方式。
实验使用 Proxmox 上的三台虚拟机。下面的名称和地址会出现在后续命令与输出中:
homelab-ctl:Rocky Linux 10.2 控制节点,10.0.1.10。web01:Rocky Linux 10.2 被管理节点,SELinux 为 enforcing 模式,10.0.1.21。nas01:Ubuntu 24.04.4 LTS,被管理节点,同时用于 Python 3.12 控制节点测试,10.0.1.22。- 每台主机都有非 root 用户
kibet,并配置免密码 sudo。
被管理节点只需 SSH 和 Python 3.9 或更高版本,当前常见发行版已经满足要求,因此不必为了 Ansible 本身在 web01 或 nas01 上安装额外组件。控制节点只向外发起到 SSH 22 端口的连接,也不需要为它开放额外防火墙端口。
第 1 步:安装前检查控制节点的 Python
文中当前的 ansible-core 要求控制节点使用 Python 3.13 或更高版本。PyPI 标明 Requires-Python >=3.13,ansible-core 变更日志也明确写出:“不再支持控制节点上的 Python 3.12。”Rocky Linux 10、RHEL 10 和 Ubuntu 24.04 的默认 python3 都是 Python 3.12,因此这会影响常见控制节点发行版。被管理节点要求不同,模块仍可在 Python 3.9 或更高版本上运行。
首先检查控制节点的 python3 是什么版本。homelab-ctl 使用 Rocky 默认解释器:
python3 --version结果为 Python 3.12.15,低于要求。为展示其影响,实验使用 pipx 对系统 Python 进行安装,pipx 安装方法见第 2 步。无需重复这个测试;如果执行了,请先用 pipx uninstall ansible-core 删除虚拟环境,再进入第 2 步:
pipx install ansible-core应阅读输出最后一行,而非只看上面的“done!”。pip 自动解析到了仍然支持 Python 3.12 的最新版本:
creating virtual environment...
creating shared libraries...
upgrading shared libraries...
WARNING: Skipping setuptools as it is not installed.
installing ansible-core...
done! ✨ 🌟 ✨
  installed package ansible-core 2.21.6, installed using Python 3.12.15
显式要求新分支,可以把没有提示的旧版本安装变成明确错误,这是快速确认控制节点解释器问题的方法:
pipx install --force 'ansible-core>=2.22'pip 列出了新分支中所有被跳过的构建版本及原因。
Fatal error from pip prevented installation. Full pip output in file:
    /home/kibet/.local/state/pipx/log/cmd_2026-11-03_04.23.19_pip_errors.log

Some possibly relevant errors from pip install:
    ERROR: Ignored the following yanked versions: 2.14.0rc1.post0
    ERROR: Ignored the following versions that require a different python version: 2.22.0 Requires-Python >=3.13; 2.22.0b1 Requires-Python >=3.13; 2.22.0b2 Requires-Python >=3.13; 2.22.0rc1 Requires-Python >=3.13; 2.22.0rc2 Requires-Python >=3.13
    ERROR: Could not find a version that satisfies the requirement ansible-core>=2.22 (from versions: 0.0.1a1, 2.11.0b1, ... , 2.21.6rc1, 2.21.6)
    ERROR: No matching distribution found for ansible-core>=2.22
Ubuntu 主机行为相同。其 apt 提供的 pipx 1.4.3 在 Python 3.12.3 上安装了同一旧版核心;显式固定新分支时,也报出相同的 Requires-Python >=3.13 错误。下面的终端截图来自 Rocky 测试:
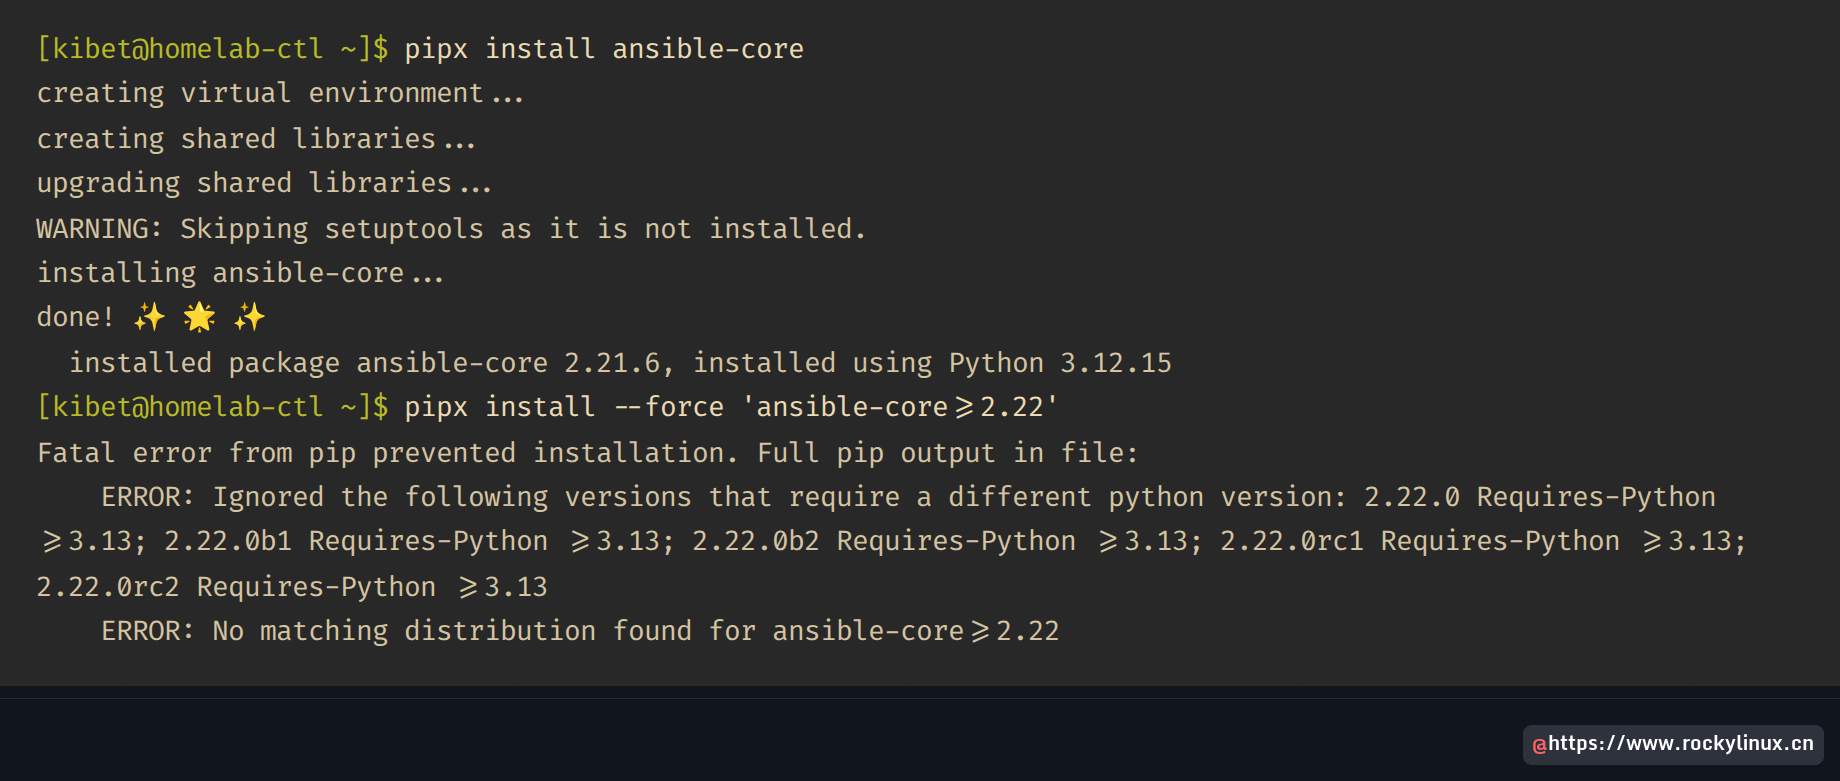
如果剧本尚未适配第 9 步描述的变化,继续使用前一条分支是合理选择。如果需要当前版本,就要在控制节点上准备更新的解释器。下一步会保留 dnf 等系统工具依赖的系统 python3,为 Ansible 单独提供新版本。
第 2 步:通过 pipx 在 Rocky Linux 10 上安装 Ansible
Rocky Linux 10 的 AppStream 将 Python 3.14 作为独立的 python3.14 软件包提供,pipx 则来自 EPEL。安装这两个包后,/usr/bin/python3 仍为 3.12,dnf 正常使用系统解释器,Ansible 使用基于 3.14 的独立虚拟环境。还应考虑:AppStream 中额外 Python 版本的支持周期短于系统 3.12,因此在 RHEL 10 生命周期后期,可能需要基于更新版本重建虚拟环境。启用 EPEL 并安装两个软件包:
sudo dnf install -y epel-release
sudo dnf install -y python3.14 pipx
接着让 pipx 使用 3.14 解释器。不提供 --python 时,它会使用系统 3.12,重复第 1 步的结果。如果 pipx 已经安装旧版 ansible-core,会打印“already seems to be installed. Not modifying existing installation”,然后正常退出,旧版仍保持不变。因此应先执行 pipx uninstall ansible-core,或使用第 9 步的 pipx reinstall:
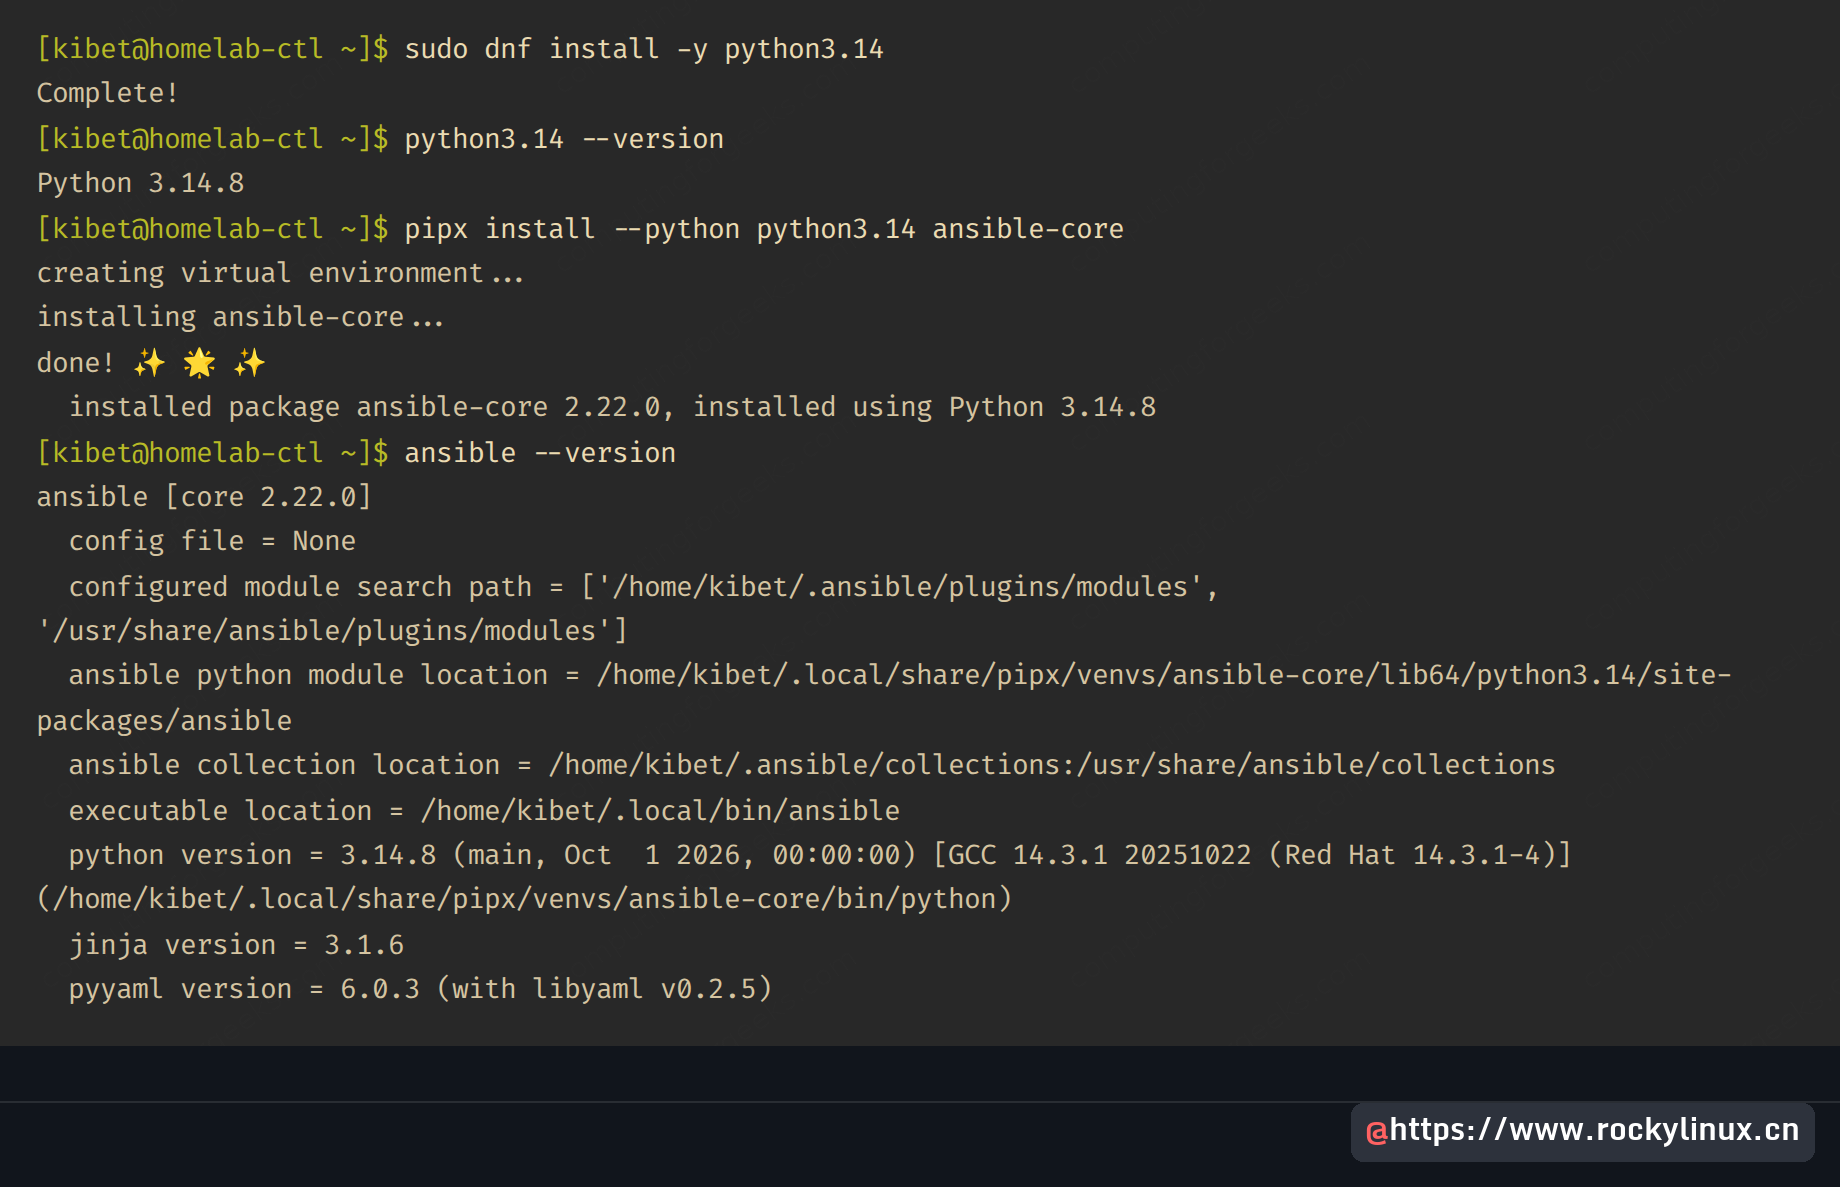
pipx install --python python3.14 ansible-core这次,汇总行显示了目标版本。
creating virtual environment...
installing ansible-core...
done! ✨ 🌟 ✨
  installed package ansible-core 2.22.0, installed using Python 3.14.8
pipx 将可执行文件放入 ~/.local/bin。Rocky 默认的 ~/.bashrc 已将该目录加入 PATH,实验中的 pipx ensurepath 也确认了这一点,因此打开新 shell 即可。继续之前,检查是否真的安装了新核心。
ansible --version重点核对两行:ansible [core ...] 是引擎版本;python version 应指向使用 3.14 的 pipx 虚拟环境,而非 /usr/bin/python3:
ansible [core 2.22.0]
  config file = None
  configured module search path = ['/home/kibet/.ansible/plugins/modules', '/usr/share/ansible/plugins/modules']
  ansible python module location = /home/kibet/.local/share/pipx/venvs/ansible-core/lib64/python3.14/site-packages/ansible
  ansible collection location = /home/kibet/.ansible/collections:/usr/share/ansible/collections
  executable location = /home/kibet/.local/bin/ansible
  python version = 3.14.8 (main, Oct  1 2026, 00:00:00) [GCC 14.3.1 20251022 (Red Hat 14.3.1-4)] (/home/kibet/.local/share/pipx/venvs/ansible-core/bin/python)
  jinja version = 3.1.6
  pyyaml version = 6.0.3 (with libyaml v0.2.5)
下面是 homelab-ctl 上同一次操作的终端截图:
RHEL 10 的 Red Hat 仓库没有 epel-release 软件包,因此上面的第一条命令在那里会失败。可以按照 RHEL 的方式启用 EPEL,即 CodeReady Builder 加 EPEL release RPM,EPEL on RHEL 10 指南介绍了该方法;也可以跳过 pipx,使用只依赖 AppStream 的普通虚拟环境。下面这个变体是在 Rocky 主机上测试的,并未在有订阅的 RHEL 主机上测试;它同样在 Python 3.14.8 上安装了当前核心:
sudo dnf install -y python3.14
python3.14 -m venv ~/ansible-venv
~/ansible-venv/bin/pip install ansible-core
采用虚拟环境方式时,要么直接调用 ~/ansible-venv/bin/ansible,要么将 ~/ansible-venv/bin 加入 PATH,因为没有工具替你把可执行文件链接到 ~/.local/bin。
只添加实际使用的集合
ansible-core 仅包含 ansible.builtin 模块;community.general 或 ansible.posix 下的模块需要从 Galaxy 安装。实验更倾向这种方式而非完整套件:控制节点执行 pipx install --python python3.14 --include-deps ansible 耗时 25 秒,占用 476 MB,安装约 90 个集合,却仍使用前一条核心分支。可以只安装大多数服务器剧本需要的两个集合:
ansible-galaxy collection install community.general ansible.posixGalaxy 自动解析依赖,因此之后的列表中会出现第三个集合。查看当前安装的集合:
ansible-galaxy collection list集合安装到用户主目录,位于 pipx 虚拟环境之外,因此以后重装 ansible-core 时仍会保留:
# /home/kibet/.ansible/collections/ansible_collections
Collection                               Version
---------------------------------------- -------
ansible.posix                            2.2.2
community.general                        14.0.0
community.library_inventory_filtering_v1 1.1.5
如果更希望使用完整套件,并能接受旧版引擎,可以执行前面的 --include-deps ansible 命令。但不要同时用 pipx 安装这两个包,因为它们都提供同名的 ansible 可执行文件。
第 3 步:需要发行版构建时使用 AppStream 软件包
Rocky Linux 10 AppStream 的 ansible-core RPM 可以正常工作,只是版本较旧:使用 Python 3.12,落后六条发布分支,不包含集合。AppStream 和 EPEL 10 都没有完整 ansible 软件包,因此 dnf install ansible 会直接失败。实验在 web01 上测试了这两种安装:
sudo dnf install -y ansible-core版本检查会显示 /usr/lib/python3.12 下的 RPM 路径,以及 /etc/ansible/ansible.cfg 系统配置文件:
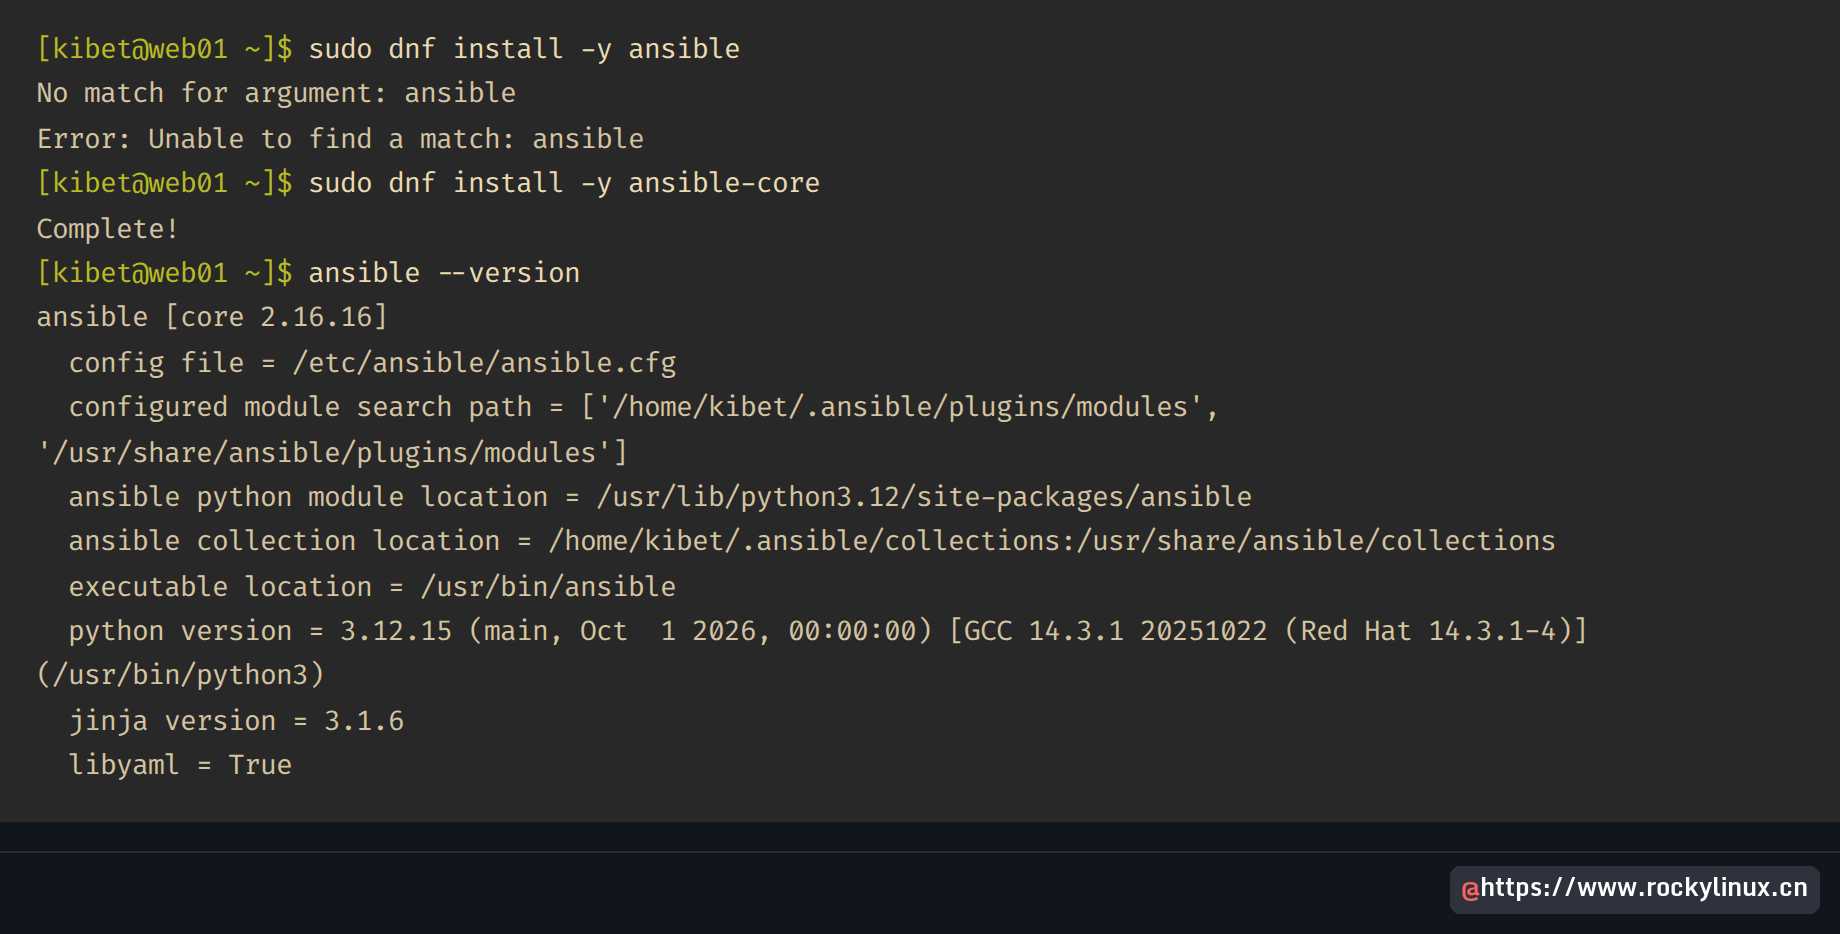
当支持合同或合规基线要求使用发行版 RPM 时,这个软件包有意义,因为它与操作系统其他部分一起通过 dnf upgrade 更新。对家庭实验室,或依据当前文档编写新剧本的环境,第 2 步的 pipx 安装更适合作为默认选择,官方文档示例通常面向较新的核心。同一控制节点上不要混用两种方式:PATH 中排在前面的 ansible 会生效,而 Rocky 的 ~/.local/bin 排在 /usr/bin 之前。
第 4 步:在 Ubuntu 24.04 上安装 Ansible
Ubuntu 24.04 有三种来源,但它们各自都无法直接安装文中当前的核心。实验在 nas01 上逐项检查,具体版本见上表:
sudo apt install ansible:完整套件,核心与 Rocky AppStream 同属较旧分支。ppa:ansible/ansible:完整套件,使用前一条核心分支。pipx install ansible-core:使用 Python 3.12.3,得到前一条核心分支。
Ubuntu 24.04 官方软件源没有 python3.13 或 python3.14,apt-cache policy 都找不到。因此,获取当前核心的较简洁路径是 uv:它把独立 Python 构建下载到主目录,保留系统解释器。先通过 apt 安装 pipx,再用 pipx 安装 uv,最后由 uv 创建 Ansible 环境。如果之前的 pipx install ansible-core 已在 ~/.local/bin 留下 ansible,应先用 pipx uninstall ansible-core 删除,实验在 nas01 上也是如此,以免两个工具争用同一个文件:
sudo apt update
sudo apt install -y pipx
pipx install uv
~/.local/bin/uv tool install --python 3.14 ansible-core
uv 自动下载 Python 3.14.10,用 1.97 秒准备九个软件包,并安装当前 ansible-core,随后提醒 ~/.local/bin 尚未加入 PATH:
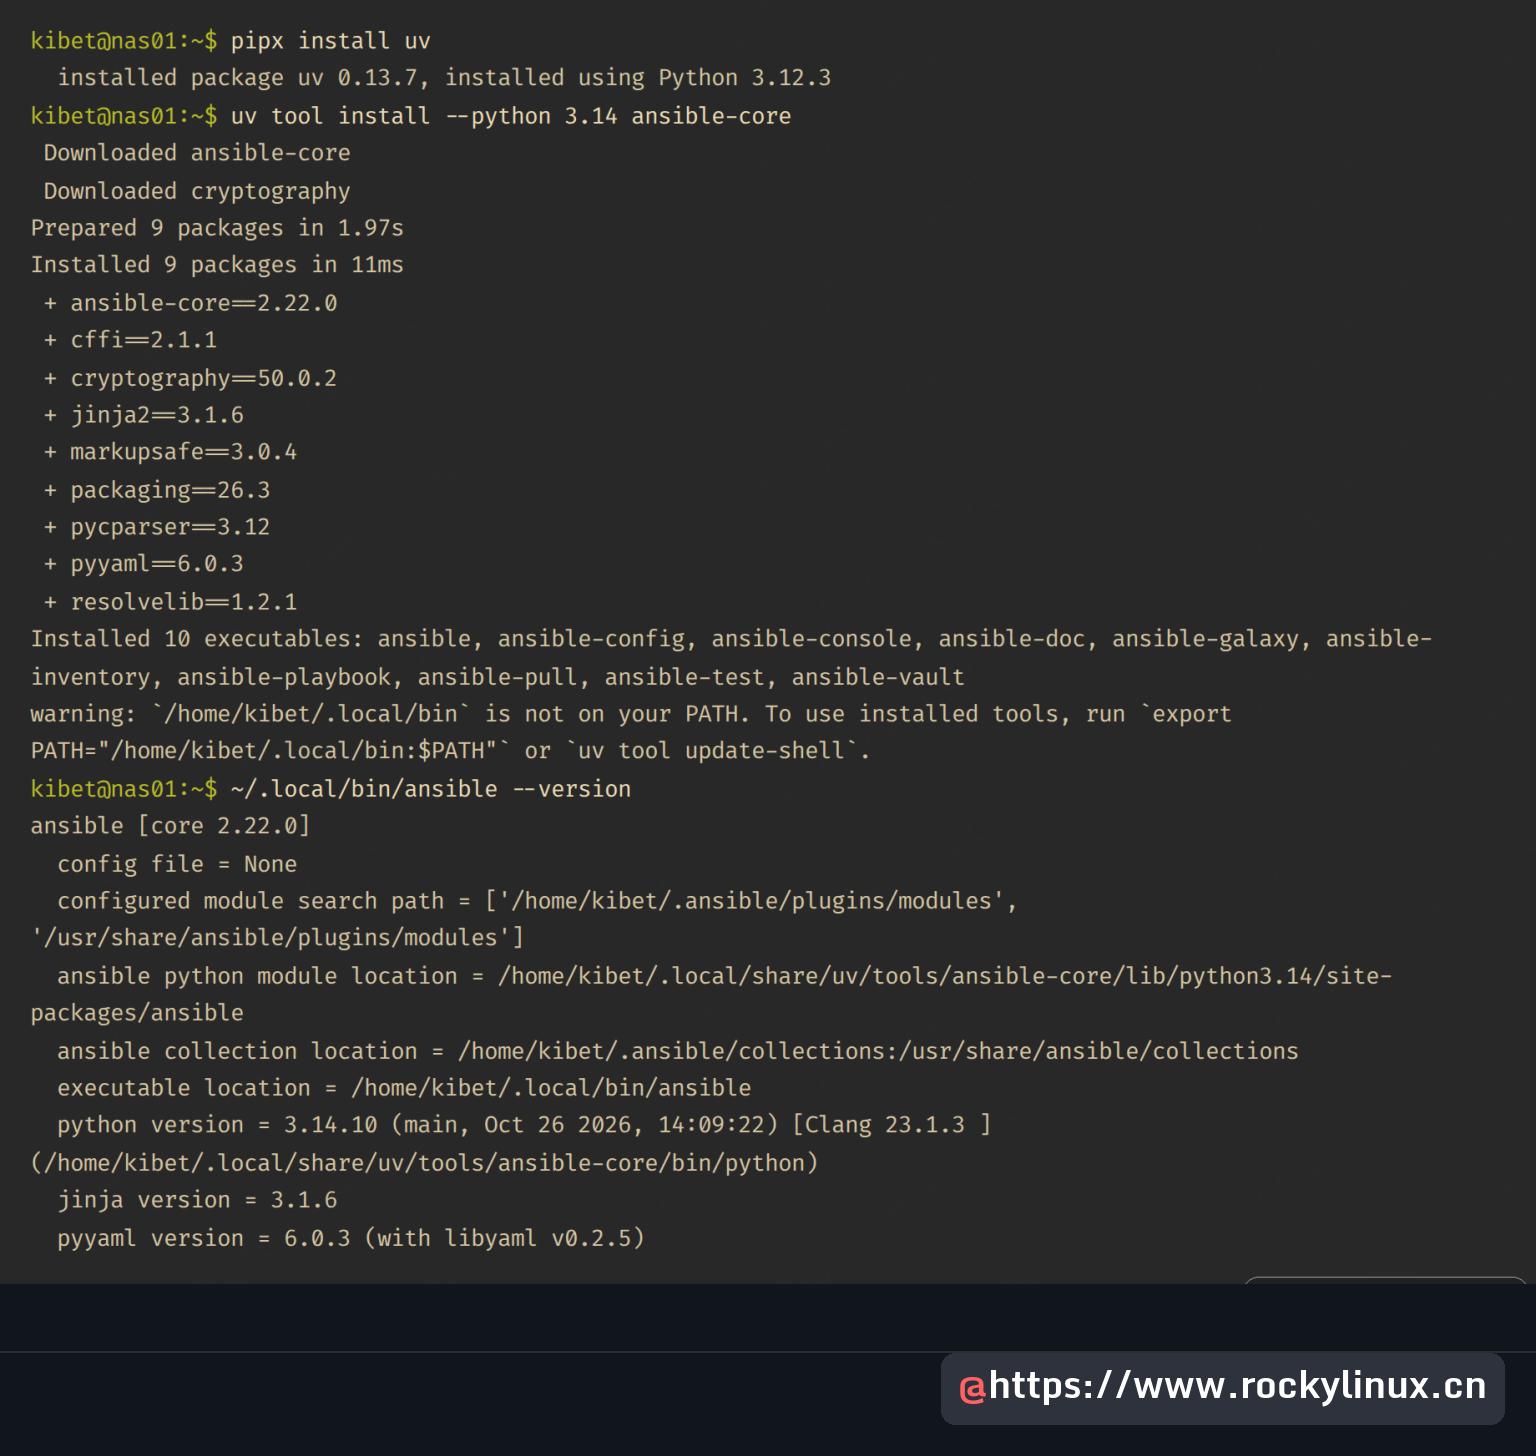
修正一次路径后,打开新 shell,就能直接调用 ansible 和 uv,无需完整路径:
pipx ensurepath如果希望 Ansible 与系统一起更新,并接受较旧分支,可以选择 apt,这与 Rocky AppStream RPM 的版本路线相似。注意,apt-cache policy 显示软件包来自 noble/universe;没有 Ubuntu Pro 时,该仓库不提供标准 Ubuntu 安全维护。PPA 是折中选项,提供基于前一分支的完整套件。若在 Ubuntu 26.04 上新建控制节点,其 apt 软件包版本较新,见上表;Ubuntu 26.04 Ansible 指南和 Debian 13 Ansible 指南分别介绍了对应发行版的完整流程。
第 5 步:在控制节点配置 SSH 密钥
Ansible 以普通用户通过 SSH 连接被管理节点,并使用 sudo 提权,因此控制节点需要一把各节点信任的密钥。在 homelab-ctl 上生成:
ssh-keygen -t ed25519 -C "kibet@homelab-ctl"将公钥复制到每个节点。ssh-copy-id 使用现有登录方式,新服务器通常是密码登录,并把公钥追加到 ~/.ssh/authorized_keys:
ssh-copy-id kibet@10.0.1.21
ssh-copy-id kibet@10.0.1.22
每次操作只要求输入一次该用户的密码,并以 Number of key(s) added: 1 结束。接着使用禁止密码提示的 BatchMode 测试;如果打印主机名,Ansible 也能以相同方式连接:
ssh -o BatchMode=yes kibet@10.0.1.21 hostname
ssh -o BatchMode=yes kibet@10.0.1.22 hostname
两个节点分别返回 web01 和 nas01。首次登录也会把各节点的主机密钥写入 ~/.ssh/known_hosts;下一步保持主机密钥检查开启,因此这一点很重要。如果私钥设置了口令,每个会话中可通过 eval "$(ssh-agent -s)" 和 ssh-add 将其加载到代理,避免 Ansible 停下来询问口令。
第 6 步:编写 ansible.cfg 与主机清单
项目目录拥有自己的 ansible.cfg,可以让配置与使用它的剧本放在一起。Ansible 按以下顺序读取找到的第一份配置:ANSIBLE_CONFIG、./ansible.cfg、~/.ansible.cfg、/etc/ansible/ansible.cfg。pipx 安装没有系统配置文件,这也是之前 ansible --version 显示 config file = None 的原因。创建项目:
mkdir -p ~/homelab-ansible/group_vars/all
cd ~/homelab-ansible
用编辑器打开配置文件:
vim ~/homelab-ansible/ansible.cfg下面就是实验第 6、7 步实际使用的配置,第 8 步会增加一行:
[defaults]
inventory = ./inventory.ini
remote_user = kibet
host_key_checking = True
retry_files_enabled = False
timeout = 30

[privilege_escalation]
become = True
become_method = sudo
become_ask_pass = False

[ssh_connection]
pipelining = True
保留 host_key_checking 开启,因为第 5 步已将密钥写入 known_hosts;关闭它只会掩盖主机密钥变化,而这种变化正应该被发现。pipelining 减少每个任务所需的 SSH 往返次数,本文所有剧本在两个发行版上都启用了该选项。接着编辑主机清单:
vim ~/homelab-ansible/inventory.ini定义两个组,每组一台主机,并为所有节点固定解释器:
[webservers]
web01 ansible_host=10.0.1.21

[storage]
nas01 ansible_host=10.0.1.22

[all:vars]
ansible_python_interpreter=/usr/bin/python3
增加 [all:vars] 是因为首次 ping 没有它时出现了警告。Ansible 在两个节点上自动发现 /usr/bin/python3.12,并提醒“以后安装其他 Python 解释器可能导致发现不同的解释器”。固定为 /usr/bin/python3 可以消除这一警告,也能适应节点上的 Python 小版本升级。
确认 Ansible 读取了你的配置。ansible-config 现在默认使用 -t all,所以输出也包含 SSH 连接选项等插件配置:
ansible-config dump --only-changed每一行都在括号中显示配置来源文件。新的 CONNECTION 区块中会出现 pipelining;顶部弃用提示来自 ansible-core 检查 oneline 和 tree 回调,不是你的配置造成的:
[WARNING]: Deprecation warnings can be disabled by setting `deprecation_warnings=False` in ansible.cfg.
[DEPRECATION WARNING]: oneline has been deprecated. Use another callback plugin, or vendor and/or move the oneline callback to a collection. This feature will be removed from ansible-core version 2.23.
Origin: <unknown>

oneline

[DEPRECATION WARNING]: tree has been deprecated. Use another callback plugin, or vendor and/or move the tree callback to a collection. This feature will be removed from ansible-core version 2.23.
Origin: <unknown>

tree

CONFIG_FILE() = /home/kibet/homelab-ansible/ansible.cfg
DEFAULT_BECOME(/home/kibet/homelab-ansible/ansible.cfg) = True
DEFAULT_BECOME_ASK_PASS(/home/kibet/homelab-ansible/ansible.cfg) = False
DEFAULT_BECOME_METHOD(/home/kibet/homelab-ansible/ansible.cfg) = sudo
DEFAULT_HOST_LIST(/home/kibet/homelab-ansible/ansible.cfg) = ['/home/kibet/homelab-ansible/inventory.ini']
DEFAULT_REMOTE_USER(/home/kibet/homelab-ansible/ansible.cfg) = kibet
DEFAULT_TIMEOUT(/home/kibet/homelab-ansible/ansible.cfg) = 30
HOST_KEY_CHECKING(/home/kibet/homelab-ansible/ansible.cfg) = True
RETRY_FILES_ENABLED(/home/kibet/homelab-ansible/ansible.cfg) = False

GALAXY_SERVERS:

CONNECTION:
==========

ssh:
___
host_key_checking(/home/kibet/homelab-ansible/ansible.cfg) = True
pipelining(/home/kibet/homelab-ansible/ansible.cfg) = True
remote_user(/home/kibet/homelab-ansible/ansible.cfg) = kibet
timeout(/home/kibet/homelab-ansible/ansible.cfg) = 30
增加 -t base 可以得到过去那种只包含核心配置的视图,没有插件区块和回调警告,适合解析输出的脚本:
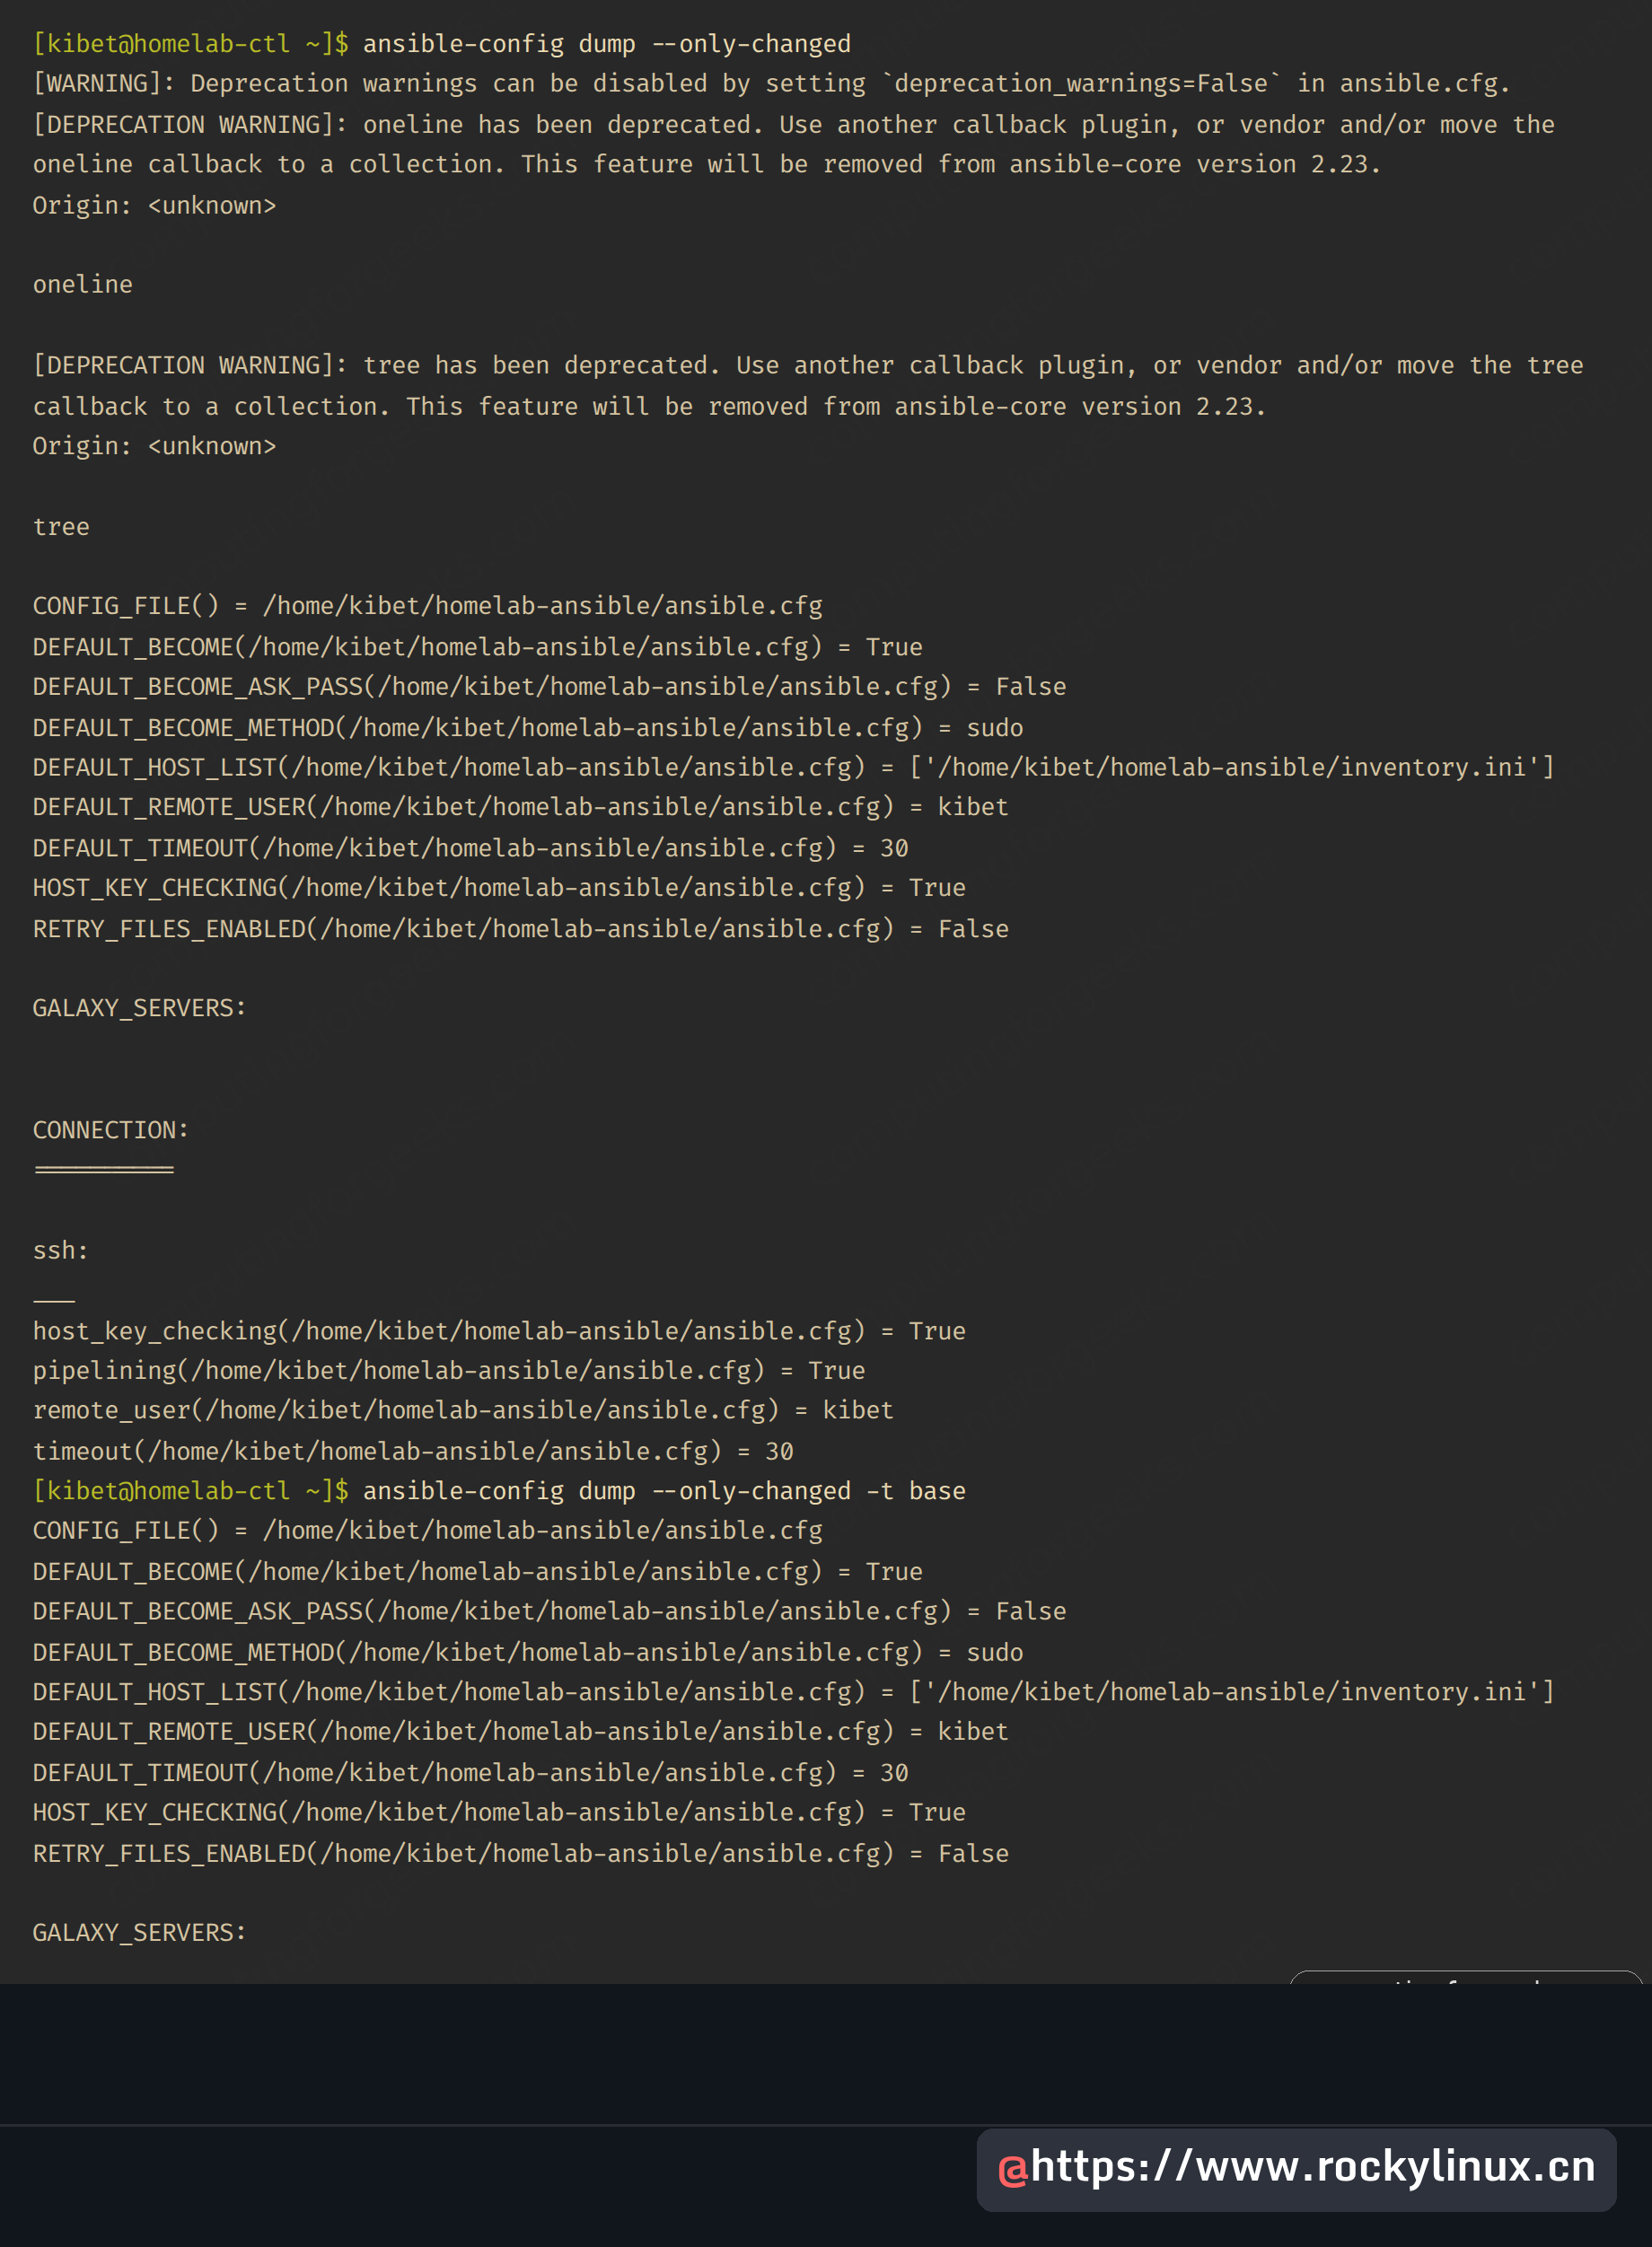
默认 -t all 也意味着,[ssh_connection] 等插件所属区块现在会由 ansible-config 验证,而不再被报告为未知。因此编辑文件后执行 ansible-config 操作,有助于发现这些区块中配置项的拼写错误。
第 7 步:运行第一批临时命令
ping 模块是真正的连通性测试:通过 SSH 登录,在节点上运行 Python,返回 pong,一次验证密钥、用户和解释器。应在项目目录内执行,以便读取 ansible.cfg:
cd ~/homelab-ansible
ansible all -m ansible.builtin.ping
两个节点都正常回应;解释器已固定,因此不再出现 discovered_interpreter_python 提示:
nas01 | SUCCESS => {
    "changed": false,
    "ping": "pong"
}
web01 | SUCCESS => {
    "changed": false,
    "ping": "pong"
}
临时命令(ad-hoc)默认使用 command 模块,所以执行只读检查时无需指定模块。可以先检查系统运行时间:
ansible all -a "uptime"每台主机单独报告结果。CHANGED 只说明命令执行了,因为 Ansible 无法判断任意命令是否真正修改了系统:
nas01 | CHANGED | rc=0 >>
 04:28:13 up 8 min,  1 user,  load average: 0.03, 0.12, 0.06
web01 | CHANGED | rc=0 >>
 04:28:13 up 9 min,  1 user,  load average: 0.00, 0.22, 0.19
剧本通过 facts(系统事实)决定分支行为。对于混合发行版环境,可以先查看发行版事实:
ansible all -m ansible.builtin.setup -a "filter=ansible_distribution*"应留意新的 ansible_distribution_cpe_name 事实。它读取 /etc/os-release 的 CPE_NAME;Rocky 返回其 CPE 字符串,而 Ubuntu 不提供该字段,返回 null:
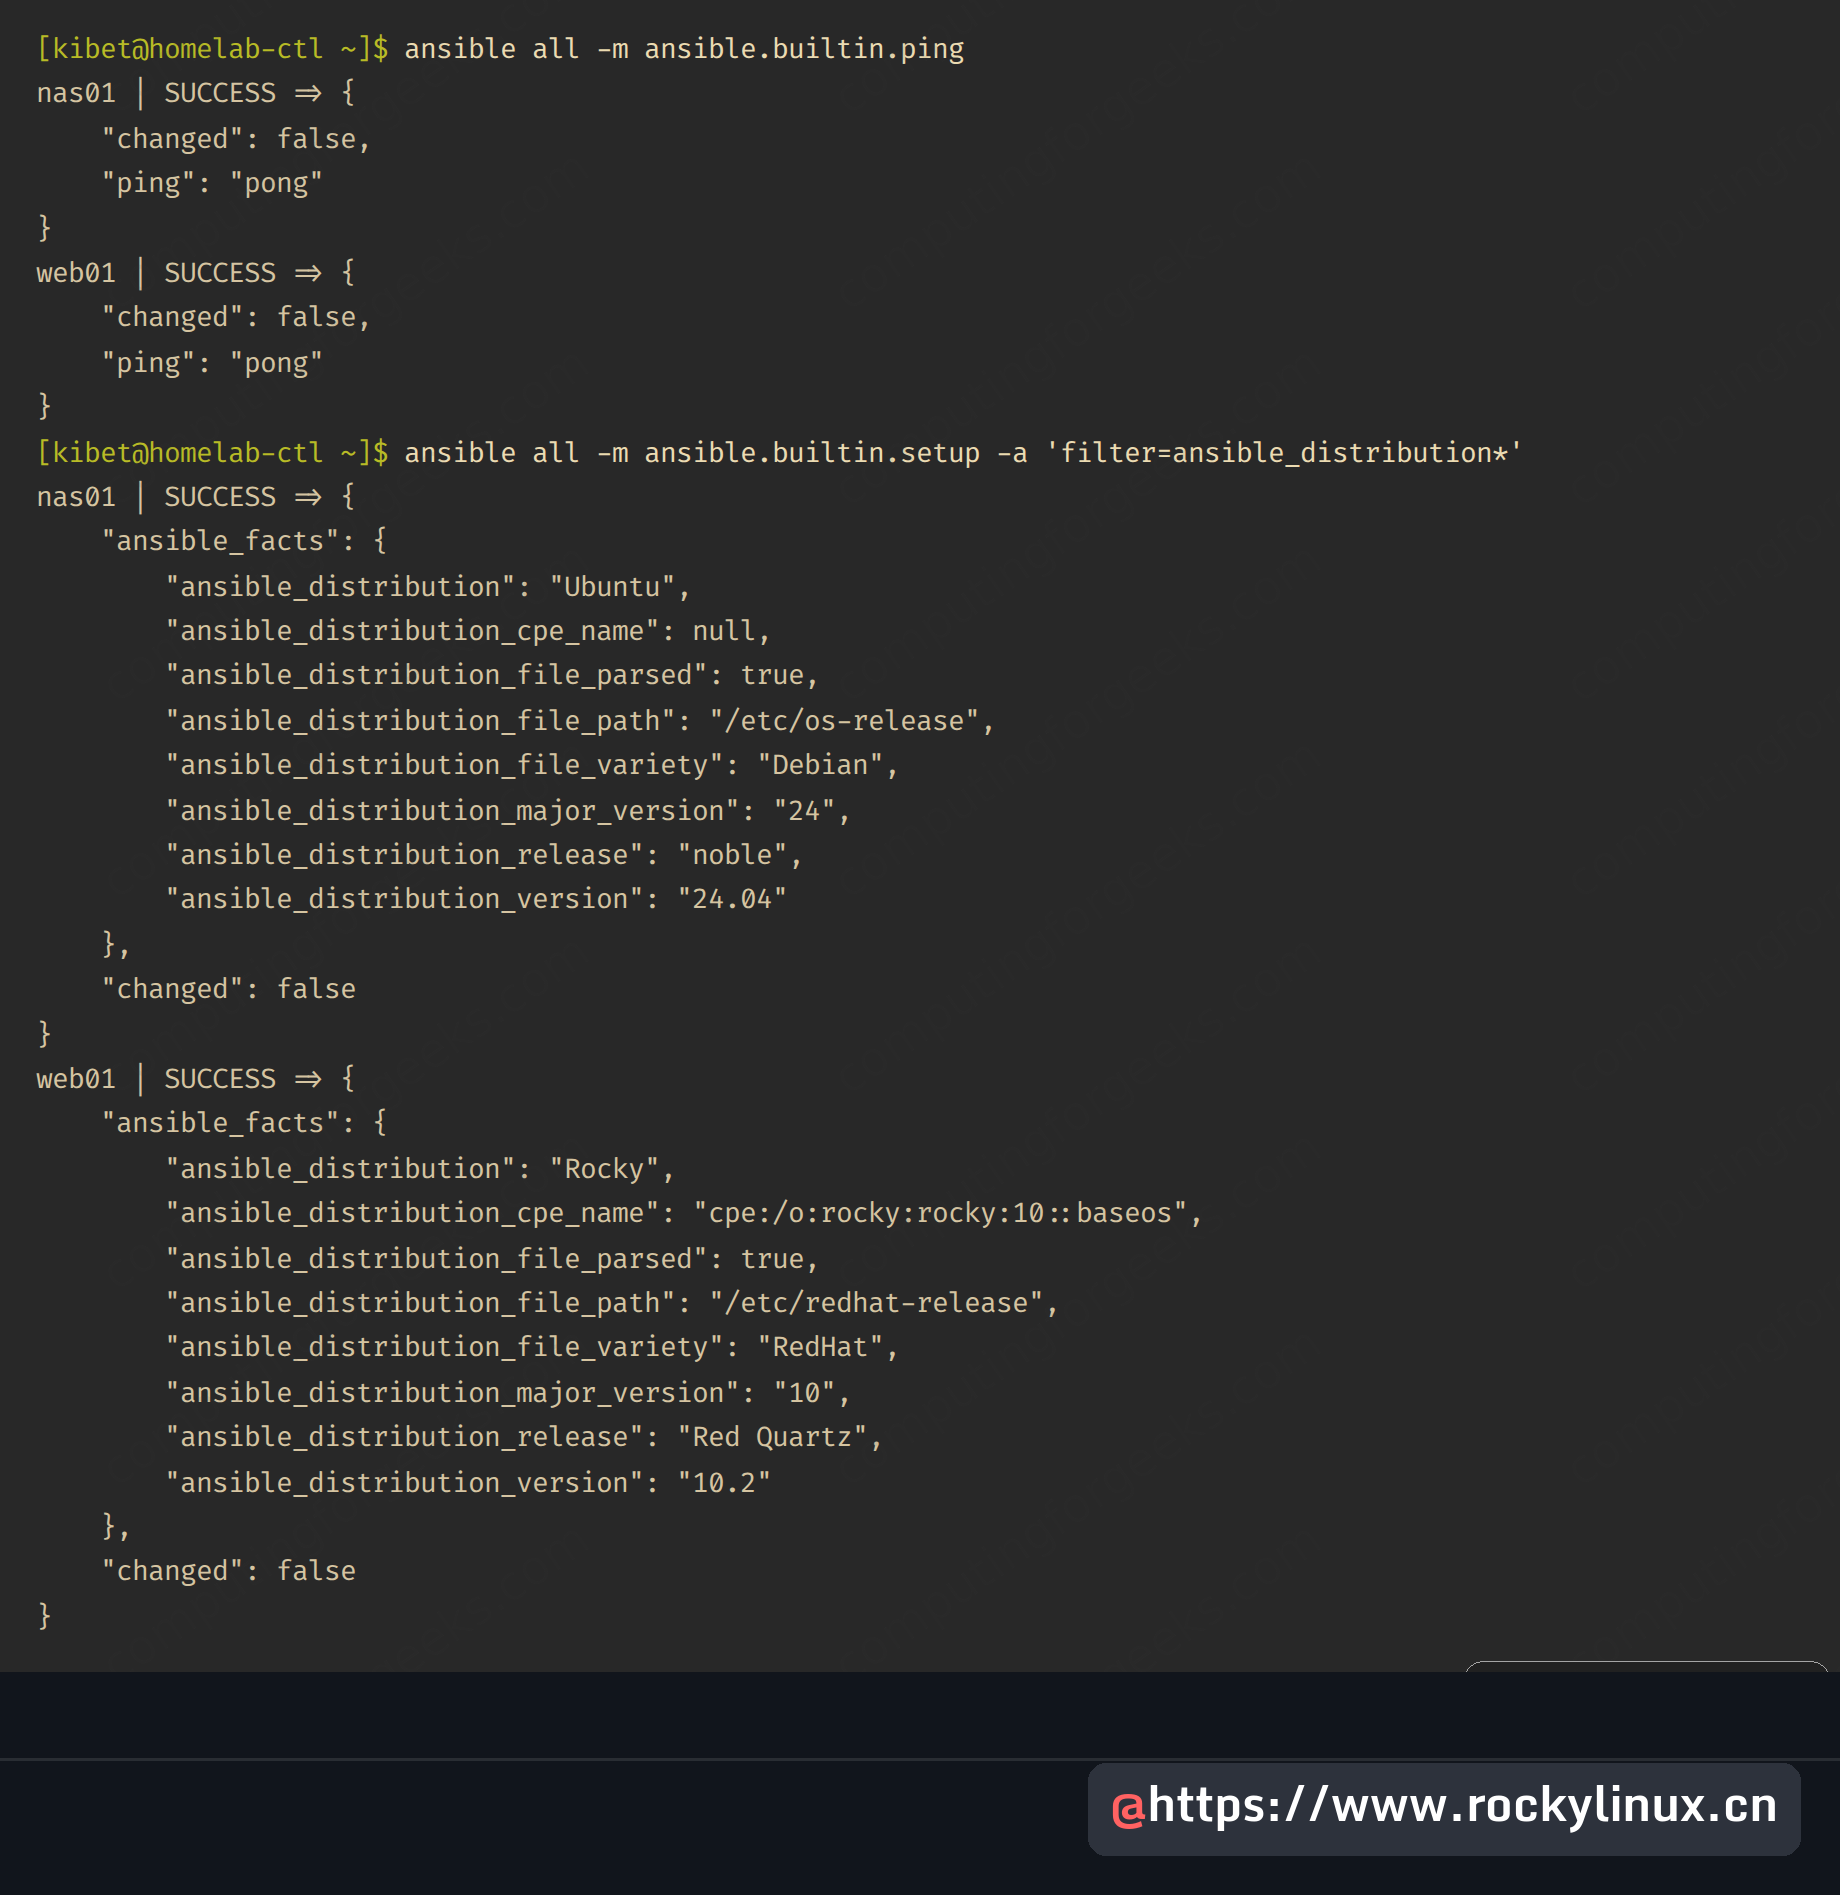
环境中包含 Ubuntu 或 Debian 主机时,不要依据 cpe_name 构造条件,因为 null 可能使字符串比较失败。ansible_distribution 和 ansible_os_family 仍是较稳妥的键;os_family 与 distribution 值列表列明了各发行版的返回值。Ansible 临时命令指南还介绍了更多类似单行命令。
第 8 步:运行包含 Vault 密文的首个剧本
安装软件包并把机密写入配置文件的剧本,可以展示新安装环境中最先注意到的两点:任务的幂等性,以及现在显示为 $REDACTED$ 的机密。先创建只有当前用户能读取的 Vault 密码文件:
echo "S9rv-Lab-2026" > ~/.vault_pass
chmod 600 ~/.vault_pass
这样写入的密码会留在 shell 历史中,因此共享主机上应改用 vim ~/.vault_pass 手动输入。接着告诉 Ansible 文件位置。只有文件创建后才能增加配置,否则 ansible.cfg 指向不存在的文件时,每次运行 ansible 或 ansible-playbook 都会因“The vault password file … was not found”失败。实验执行了下面这条 sed 命令,将设置插入 [defaults] 中 timeout 的下一行:
sed -i "/^timeout = 30/a vault_password_file = ~/.vault_pass" ansible.cfg将机密写入所有主机共享的变量文件,再原地加密。ansible-vault 从 ansible.cfg 读取密码文件,因此不会再次提示输入:
echo "db_pass: Tr0ub4dor-Homelab" > group_vars/all/vault.yml
ansible-vault encrypt group_vars/all/vault.yml
head -2 group_vars/all/vault.yml
文件现在以 Vault 标头开头,而不是 YAML,读取仓库的人无法直接看到密码:
$ANSIBLE_VAULT;1.1;AES256
39386639376631366132613730326636646464613363363938343437356330373363396335363830
接着创建剧本:
vim ~/homelab-ansible/site.yml它使用跨发行版的 package 模块安装 chrony,通过 debug 输出密码,将密码写入 /etc/app.env,并显示注册结果:
---
- name: First playbook against the homelab
  hosts: all
  tasks:
    - name: Install chrony
      ansible.builtin.package:
        name: chrony
        state: present

    - name: Show which password the app will use
      ansible.builtin.debug:
        msg: "Connecting to the database with {{ db_pass }}"

    - name: Write the password into the app config
      ansible.builtin.copy:
        dest: /etc/app.env
        content: "DB_PASS={{ db_pass }}\n"
        mode: "0600"
      register: env_file

    - name: Show the registered copy result
      ansible.builtin.debug:
        var: env_file
先检查语法,再运行:
ansible-playbook site.yml --syntax-check
ansible-playbook site.yml
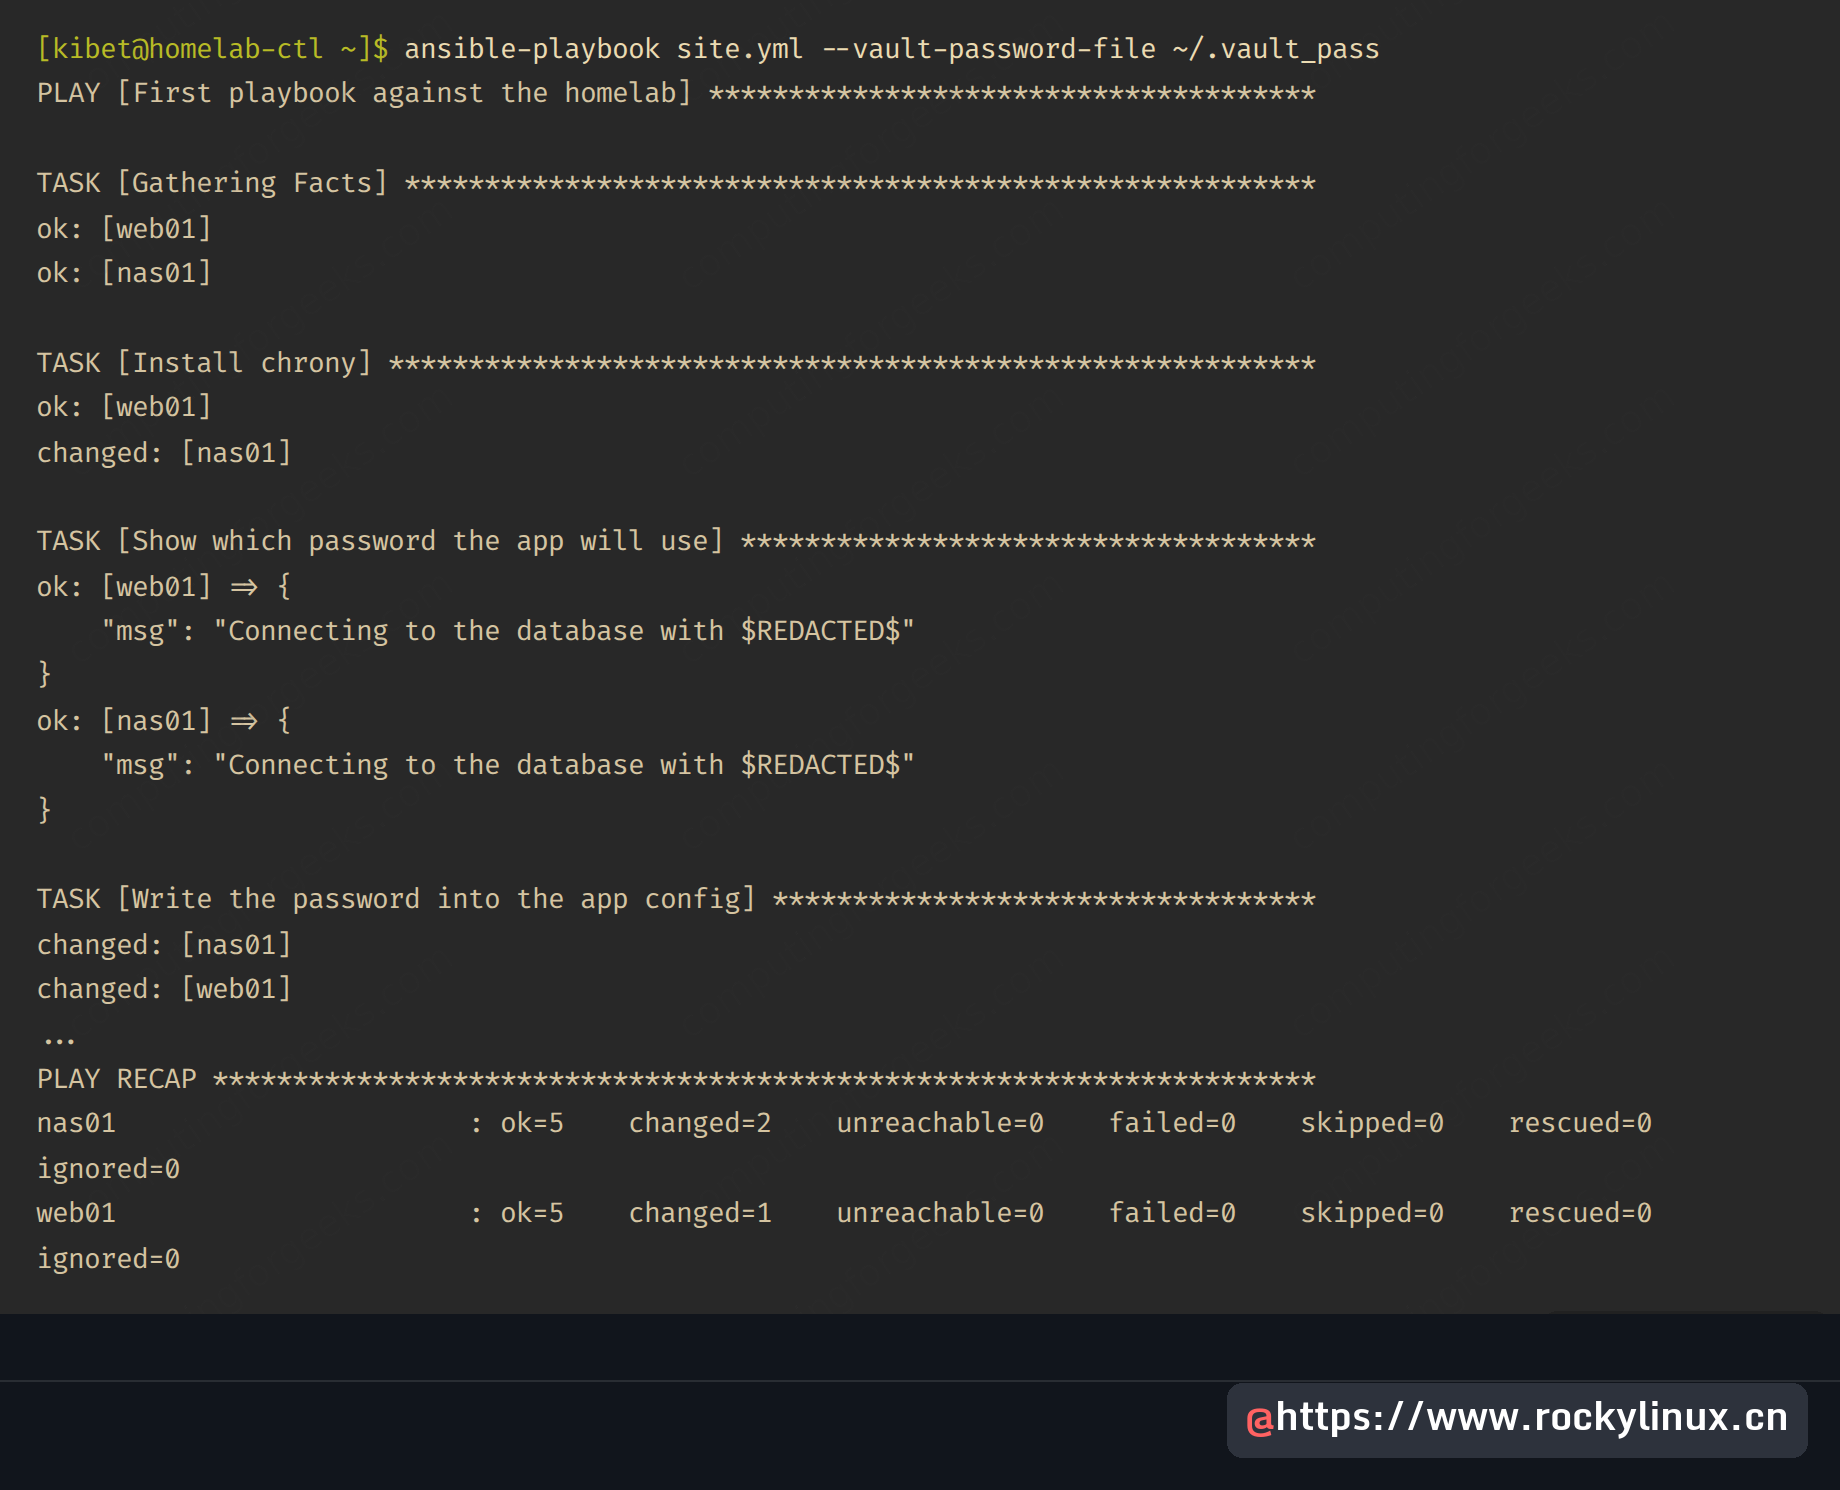
Rocky 镜像已安装 chrony,因此这项任务只有 nas01 报告变化。值得关注的是 debug 任务:ansible-core 将解密后的 Vault 值登记为机密,在显示输出时进行掩码处理:
最后一个任务输出注册结果。除了查看有哪些字段,也要注意缺少什么:
ok: [web01] => {
    "env_file": {
        "ansible_parsed": true,
        "changed": true,
        "checksum": "9ec34752266f36693a6380801a6dfb0156803ae6",
        "dest": "/etc/app.env",
        "diff": [],
        "failed": false,
        "gid": 0,
        "group": "root",
        "md5sum": "f351c41165f3b9312fbc1423900095fe",
        "mode": "0600",
        "owner": "root",
        "secontext": "system_u:object_r:etc_t:s0",
        "size": 26,
        "src": "/home/kibet/.ansible/tmp/ansible-tmp-1793680111.4514003-52386-10982625494549/.source.env",
        "state": "file",
        "uid": 0
    }
}
结果没有 invocation 键,因为 Python 模块默认不再将其加入任务结果。这个变化在前一条发布分支就已引入,因此从至少两条分支之前升级才可能首次遇到。如果旧剧本读取 result.invocation.module_args,可设置 ANSIBLE_INJECT_INVOCATION=true,或在 [defaults] 下设置 inject_invocation = True,该键就会重新出现,实验第二次运行确认了这一点。secontext 也表明 web01 上的文件获得正常的 etc_t 标签,SELinux enforcing 模式无需额外处理。
掩码只影响显示,这一点适合自行验证。先让 Ansible 读回文件,再通过普通 SSH 读取:
ansible web01 -a "cat /etc/app.env"
ssh kibet@10.0.1.21 sudo cat /etc/app.env
Ansible 连命令输出中的值也会遮蔽,而磁盘上的文件仍保存真实密码:
web01 | CHANGED | rc=0 >>
DB_PASS=$REDACTED$
DB_PASS=Tr0ub4dor-Homelab
因此,template 和 copy 任务仍收到真实机密,只有日志、回调和终端显示 $REDACTED$。过去 Vault 值可能直接以明文显示,标记为 no_log 的模块参数则返回字面占位符 VALUE_SPECIFIED_IN_NO_LOG_PARAMETER。依赖该占位符的测试需要更新,因为模块结果现在携带真实值,掩码发生在显示阶段。Ansible Vault 教程进一步说明 Vault ID 和重新加密;首个 Ansible 剧本教程则介绍处理器与变量。
第 9 步:将现有安装升级到新核心
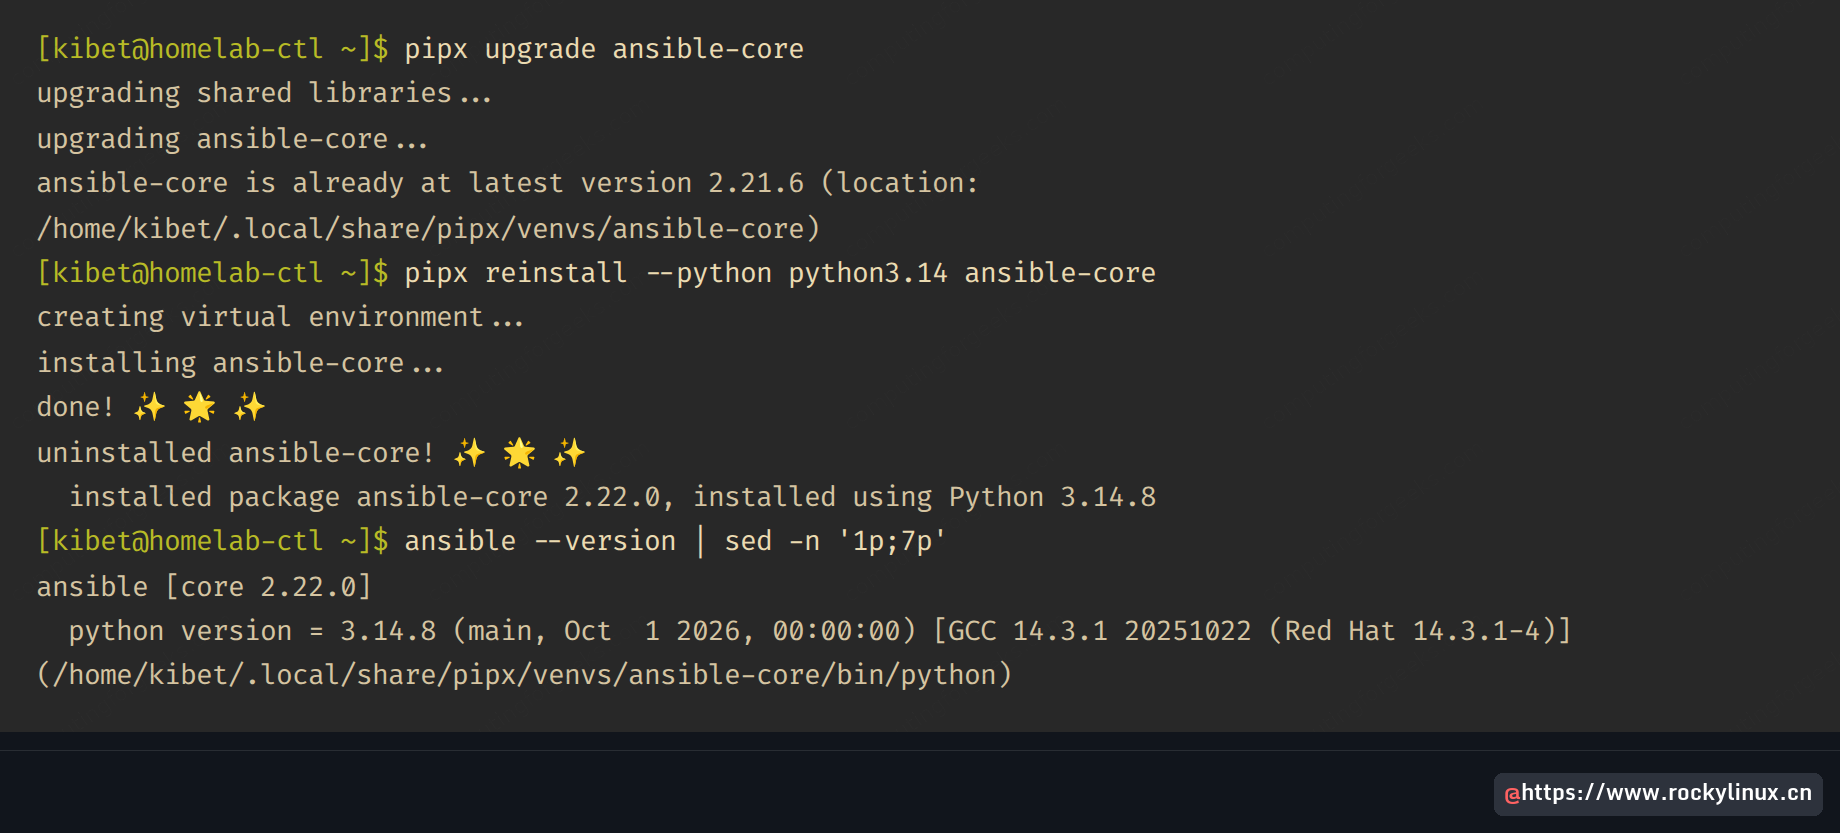
如果几个月前用系统 Python 和 pipx 安装了 Ansible,pipx upgrade 不会迁移到新发布分支。虚拟环境仍使用 Python 3.12,pip 找不到更高且兼容的版本,仍报告成功:
pipx upgrade ansible-core这里的“Already at latest”指的是当前解释器可用的最新版本,并非 PyPI 上最新版本。
upgrading shared libraries...
upgrading ansible-core...
ansible-core is already at latest version 2.21.6 (location:
/home/kibet/.local/share/pipx/venvs/ansible-core)应使用较新解释器重建虚拟环境。pipx reinstall 保留包名,替换底层 Python;先按第 2 步安装 python3.14:
pipx reinstall --python python3.14 ansible-core终端截图展示了 homelab-ctl 的升级前后,最终使用新核心与 Python 3.14.8:
Ubuntu 上通过 uv 并使用 --python 3.14 安装后,日常升级命令是 uv tool upgrade ansible-core。实验主机已经是最新版本,因此返回“Nothing to upgrade”。升级运行真实业务剧本的控制节点前,应核对实验中遇到的行为变化:
- 注册结果不再包含
invocation键;从至少两条分支之前升级时需要关注。 no_log值和 Vault 机密显示为$REDACTED$。uri的follow_redirects: yes现在失败;原来的 yes 改为all,no 改为none。ansible-config命令默认使用-t all。
前两项主要影响检查任务结果的剧本,而 uri 的变化会直接让任务失败,因此应先在角色中搜索 follow_redirects。第 1 步提到的变更日志列出其他变化,第 6 步的 oneline 和 tree 警告也说明,这两个回调计划在下一版 ansible-core 中移除。
实验中遇到的故障
下面每个错误都在编写原文的实验过程中实际出现,随后给出当时采用的修复方法。
“No matching distribution found for ansible-core”
控制节点使用 Python 3.12,pip 输出上一行会说明原因:Requires-Python >=3.13。Rocky 或 RHEL 10 上从 AppStream 安装 python3.14,并向 pipx 传入 --python python3.14;Ubuntu 24.04 上则使用 uv tool install --python 3.14。如果不固定版本,可能完全没有错误,只安装较旧核心,因此始终检查“installed package”一行。
“Attempting to decrypt but no vault secrets found”
跳过或后来删除 vault_password_file 配置时,会遇到这个错误。实验最初尚未加入该行,一旦存在 group_vars/all/vault.yml,即使普通 ansible web01 -m ansible.builtin.ping 也会失败,因为 Ansible 无论执行临时命令还是剧本,都会加载所访问主机的组变量。每条命令传入 --vault-password-file ~/.vault_pass 可以解决,但第 8 步写入 ansible.cfg 的 vault_password_file 能对整个项目生效。密码文件权限应为 600,并排除在 Git 之外。
“value of follow_redirects must be one of: all, none, safe, urllib2, got: yes”
实验对 web01 执行了带 follow_redirects=yes 的临时 uri 请求,这是许多旧角色的写法,任务报出了上述错误。uri 模块已删除 yes 和 no 取值。旧的 yes 对应 all,旧的 no 对应 none,应一一替换;模块默认的 safe 只跟随 GET 与 HEAD 的重定向,对期望 30x 状态码的任务可能造成无提示的行为变化。同一次请求改用 follow_redirects=safe 后返回状态 200。
“Permission denied (publickey,gssapi-keyex,gssapi-with-mic)”
实验第一次运行 ssh-copy-id,打印“All keys were skipped because they already exist on the remote system”,但随后登录 web01 失败并出现此错误。ssh-copy-id 通过尝试登录判断密钥是否存在;当时测试连接通过另一把密钥成功,因此跳过了复制。如果目标主机不可能已有这把密钥却出现跳过提示,可运行 ssh-copy-id -f kibet@10.0.1.21 强制复制,再重复第 5 步的 BatchMode 测试。
“Ansible requires Python 3.9 or newer on the target”
这是被管理节点的 Python 要求,消息来自 ansible-core 模块代码。Rocky 10、Ubuntu 24.04 和 Debian 13 均高于最低要求,所以通常只会在仍使用平台 Python 3.6 的 RHEL 8 等旧主机上遇到。为该主机安装较新 Python,并在主机清单中设置其 ansible_python_interpreter。
回滚或移除 Ansible
如果新核心导致剧本失败,需要当天恢复旧版本,可在同一 pipx 虚拟环境中固定前一条分支。--force 复用已有环境,因此 Python 仍为 3.14:
pipx install --force "ansible-core<2.22"实验控制节点这样恢复了前一核心;执行同样的命令但仅指定 ansible-core,则重新回到当前版本。要完全移除 Ansible,应使用与安装方式对应的命令:
- pipx:
pipx uninstall ansible-core。 - uv:
uv tool uninstall ansible-core。 - Rocky 或 RHEL RPM:
sudo dnf remove ansible-core。 - Ubuntu apt:
sudo apt purge ansible ansible-core。
这些卸载操作都不影响 ~/.ansible/collections 或项目目录,因此集合和剧本在重装后仍会保留。只有需要完全清理时才删除 ~/.ansible。