
概述
本章,您将学习到如何将 Nginx 和 PHP 一起搭配使用,构建动态网站。
工作原理
您需要首先在 Nginx 当作做相应的 FastCGI 配置,配置完成后,当客户端或浏览器请求 PHP 资源时,Nginx 会将请求转发给 PHP-FPM 进行处理。在这套组合中,Nginx 负责静态资源处理和请求转发,PHP-FPM 则专注于解析 PHP 代码。
术语说明如下:
- CGI(Common Gateway Interface,通用网关接口):底层本质是一套开放式通信协议,用于规范 Web 服务器与动态脚本程序之间的数据交互格式;日常语境中也指代基于该协议衍生出的动态响应生成技术。传统 CGI 因性能缺陷问题已基本淘汰,当前行业中主流使用的是它的高性能改进版本,即 FastCGI。
- PHP-FPM:PHP 专属的 FastCGI 进程管理器,作为 FastCGI 协议的后端实现,负责 PHP 代码的解析执行,最终生成 HTML 响应返回给 Nginx
工作流程图如下:
正在加载 Flowchart 图表...
环境说明
环境说明如下:
| 角色 | IP 地址 | OS | 安装方式 | 版本 |
|---|---|---|---|---|
| Web 服务器(Nginx) | 192.168.100.20/24 | RL 8.10 | 源码编译安装 | 1.31.5 |
| 编程语言(PHP) | 192.168.100.21/24 | RL 10.2 | 源码编译安装 | 8.5.11 |
同 Nginx 一样,PHP 编程语言由于不太需要经常变动,因此建议在机器数量较少的情况下(少于 10 台机器)使用源码编译安装的方式。
--with-apxs2=[FILE] 依赖 Apache httpd 的 apxs 二进制文件。但在 LNMP 架构中则不太一样,若 Nginx、MySQL、PHP 均采用源码编译安装的方式,则无先后编译安装顺序,因为 Nginx 和 PHP 通过 FastCGI 协议进行通信。PHP
安装 PHP
PHP 编译安装的过程如下:
Shell > wget -c https://www.php.net/distributions/php-8.5.11.tar.gz

Shell > tar -vxf php-8.5.11.tar.gz -C /usr/local/src/

Shell > cd /usr/local/src/php-8.5.11/

Shell > ./configure \
--prefix=/usr/local/php8.5 \
--with-fpm-user=nobody \
--with-fpm-group=nobody \
--with-config-file-path=/usr/local/php8.5/etc \
--enable-fpm \
--enable-calendar \
--with-zlib \
--with-zip \
--with-bz2 \
--with-curl \
--with-openssl \
--enable-gd \
--enable-bcmath \
--with-webp \
--with-jpeg \
--with-xpm \
--with-xsl  \
--with-freetype \
--with-mhash \
--with-gettext \
--enable-mbstring \
--enable-intl \
--enable-mysqlnd \
--with-pdo-mysql=mysqlnd \
--with-mysqli \
--enable-pcntl \
--enable-shmop \
--enable-soap \
--enable-sockets \
--enable-sysvmsg \
--enable-sysvsem \
--enable-sysvshm \
--disable-ipv6 \
--disable-cgi \
&& make && make install
可能会缺少编译环境对应的依赖软件包,执行以下命令即可("\" 表示命令交互未结束):
Shell > dnf5 -y install gcc gcc-c++ libxml2 libxml2-devel \
openssl openssl-devel curl curl-devel sqlite sqlite-devel \
libicu libicu-devel oniguruma oniguruma-devel zip libzip libzip-devel \
libpng libpng-devel libwebp libwebp-devel libxslt libxslt-devel \
libjpeg-turbo libjpeg-turbo-devel libXpm libXpm-devel \
freetype freetype-devel bzip2 bzip2-devel cmake
其中部分依赖软件包存放在 devel 存储库中,开启这个 devel 存储库即可:
Shell > sed -i '1,12s/'enabled=0'/'enabled=1'/g' /etc/yum.repos.d/rocky-devel.repo编译安装结束后的目录:
Shell > ls -l /usr/local/php8.5/
total 28
drwxr-xr-x 2 root root 4096 Oct 20 23:32 bin
drwxr-xr-x 3 root root 4096 Oct 20 23:31 etc
drwxr-xr-x 3 root root 4096 Oct 20 23:31 include
drwxr-xr-x 3 root root 4096 Oct 20 23:31 lib
drwxr-xr-x 4 root root 4096 Oct 20 23:31 php
drwxr-xr-x 2 root root 4096 Oct 20 23:31 sbin
drwxr-xr-x 4 root root 4096 Oct 20 23:31 var
复制源码中的文件到安装后的配置目录(PHP 的配置文件以 .ini 结尾):
Shell > cp -p /usr/local/src/php-8.5.11/php.ini-production /usr/local/php8.5/etc/php.ini类似 RL 9.x 和 RL 10.x 中 NetworkManager 网卡配置文件的 init 风格,php.ini 配置文件的结构说明如下:
- 以
;开头表示注释行 - 使用 "[" 和 "]" 包含声明的节标题,在节标题的下方则是具体的键值对,在下一个节标题出现之前的所有键值对都属于对应的节标题
- 键值对中等号两边可以允许有空格,也允许没有空格
RL 9.x 和 RL 10.x 中 NetworkManager 网卡配置文件的部分内容:
Shell > cat /etc/NetworkManager/system-connections/ens160.nmconnection
[connection]
id=ens160
uuid=5903ac99-e03f-46a8-8806-0a7a8424497e
type=ethernet
interface-name=ens160
timestamp=1670056998

[ethernet]
mac-address=00:0C:29:47:68:D0

[ipv4]
address1=192.168.100.4/24,192.168.100.1
dns=8.8.8.8;114.114.114.114;
method=manual
...
php.ini 文件的部分内容(去掉了注释行与空白行):
Shell > grep -v -E "^$|^;" /usr/local/php8.5/etc/php.ini
[PHP]
engine = On
short_open_tag = Off
precision = 14
output_buffering = 4096
zlib.output_compression = Off
implicit_flush = Off
unserialize_callback_func =
serialize_precision = -1
disable_functions =
zend.enable_gc = On
...
[Date]
...
配置 PHP
php.ini 文件暂时先不修改,但是需要修改与 php-fpm 相关的内容。步骤如下:
# 创建系统用户 nginx 和系统用户组 nginx
Shell > groupadd -r nginx
Shell > useradd -r -g nginx nginx
Shell > id nginx
uid=994(nginx) gid=994(nginx) groups=994(nginx)

# 输出重定向
Shell > cat /usr/local/php8.5/etc/php-fpm.d/www.conf.default > /usr/local/php8.5/etc/php-fpm.d/www.conf

# 修改 www.conf 文件
Shell > vim /usr/local/php8.5/etc/php-fpm.d/www.conf
[www]
; 修改
user = nginx
; 修改
group = nginx

; 修改这行
listen = 192.168.100.21:9000

; 添加这行
listen.allowed_clients = 192.168.100.20

pm = dynamic
pm.max_children = 5
pm.start_servers = 2
pm.min_spare_servers = 1
pm.max_spare_servers = 3

# 接着使用重定向生成 php-fpm.conf 文件:
Shell > cat /usr/local/php8.5/etc/php-fpm.conf.default > /usr/local/php8.5/etc/php-fpm.conf

# 测试 /usr/local/php8.5/etc/php-fpm.conf 文件
Shell > /usr/local/php8.5/sbin/php-fpm -t
[23-Oct-2026 21:50:28] NOTICE: configuration file /usr/local/php8.5/etc/php-fpm.conf test is successful
创建需要的目录(后面会说明为什么需要这么做):
Shell > mkdir -p /var/html/tests/变更文件所有者和所属组:
Shell > chown -R nginx:nginx /var/html/tests/

Shell > chown nginx:nginx /usr/local/php8.5/etc/php-fpm.conf /usr/local/php8.5/etc/php-fpm.d/www.conf
启动 php-fpm
启动 php-fpm:
Shell > /usr/local/php8.5/sbin/php-fpm

# 查看套接字和端口信息
Shell > ss -tulnp
Netid        State         Recv-Q        Send-Q                Local Address:Port               Peer Address:Port       Process
udp          UNCONN        0             0                         127.0.0.1:323                     0.0.0.0:*           users:(("chronyd",pid=827,fd=4))
udp          UNCONN        0             0                             [::1]:323                        [::]:*           users:(("chronyd",pid=827,fd=5))
tcp          LISTEN        0             128                         0.0.0.0:22                      0.0.0.0:*           users:(("sshd",pid=904,fd=7))
tcp          LISTEN        0             4096                 192.168.100.21:9000                    0.0.0.0:*           users:(("php-fpm",pid=2763,fd=6),("php-fpm",pid=2762,fd=6),("php-fpm",pid=2761,fd=8))
tcp          LISTEN        0             128                            [::]:22                         [::]:*           users:(("sshd",pid=904,fd=8))
Nginx
配置 Nginx
在 Nginx 主配置文件中,核心是需要通过 fastcgi_pass 指令指向 php-fpm 所在的 IP 地址和端口。
# 先创建需要的目录
Shell > mkdir -p /var/html/tests/
Nginx 的示例配置如下:
user  nginx;
worker_processes  auto;

error_log  logs/error.log  error;

pid        logs/nginx.pid;

events {
    use epoll;
    worker_connections  1024;
    multi_accept on;
}

http {
    include       mime.types;
    default_type  application/octet-stream;

    log_format  main  '$remote_addr - $remote_user [$time_local] "$request" '
                      '$status $body_bytes_sent "$http_referer" '
                      '"$http_user_agent" "$http_x_forwarded_for"';

    sendfile       on;
    tcp_nopush     on;

    keepalive_timeout  30;
    server_tokens off;

    gzip on;
    gzip_vary on;
    gzip_buffers 32 4K;
    gzip_comp_level 5;
    gzip_types text/plain text/css text/xml application/json application/javascript application/xml application/xhtml+xml image/svg+xml application/x-font-ttf application/x-font-opentype application/vnd.ms-fontobject font/woff;
    gzip_min_length 256;

    upstream php8 {
        server 192.168.100.21:9000;
        keepalive 15;
    }

    server {
        listen  192.168.100.20:80;
        server_name my-tests.com www.my-tests.com;
        access_log  logs/my-tests.log  main;
        charset utf-8;

        root   /var/html/tests/;
        index  index.php index.html index.htm;

        # 禁止访问隐藏文件,隐藏文件即点文件
        location ~ /\. {
            deny all;
            access_log off;
            log_not_found off;
        }

        location / {
            try_files $uri $uri/ /index.php?$query_string;
        }

        # 使用不区分大小写的正则表达式匹配
        location ~* \.php$ {
                try_files $uri =404;
                fastcgi_keep_conn on;

                # 关键配置
                fastcgi_pass php8;

                # 关键配置
                fastcgi_index index.php;

                # 关键配置:必须包含标准 FastCGI 参数,fastcgi_params 文件默认存在于 /usr/local/nginx/conf/ 目录中
                include fastcgi_params;

                # 关键配置
                fastcgi_param SCRIPT_FILENAME $document_root$fastcgi_script_name;

                # 可选优化配置
                fastcgi_connect_timeout 5s;
                fastcgi_send_timeout 30s;
                fastcgi_read_timeout 30s;
        }
    }
}
说明如下:
- 定义一个名为 php8 且启用长连接的上游服务器。
keepalive指令的指令参数默认只对proxy_pass指令生效。 - Nginx 的网页根目录为
/var/html/tests/ log_not_found指令 - 当文件未找到时,是否将相关记录写入到错误文件中(error_log指令指定的错误文件)try_files- 按照顺序检查文件或目录是否存在,一旦找到第一个对应文件,Nginx 会停止后续检查。PHP 常见配置为try_files $uri $uri/ /index.php?$query_string;,即 "静态资源优先,动态请求兜底"try_files $uri =404;- 文件不存在时直接返回 404 状态码,不用转发给 PHP 进行处理fastcgi_keep_conn on;- 对对应的 FastCGI 服务器启用 TCP 长连接功能,主要是搭配 upstream 上下文中的keepalive 16;fastcgi_index index.php;- 设置一个文件名,该文件名将被追加到以斜杠结尾的 URI 之后,并作为$fastcgi_script_name变量的值-
fastcgi_param SCRIPT_FILENAME $document_root$fastcgi_script_name;- 该指令用来设置一个应传递给 FastCGI 服务器的参数,此处SCRIPT_FILENAME表示参数名,$document_root$fastcgi_script_name表示参数的值,用$表示相关的 Nginx 内置变量$document_root- Nginx 的内置变量,该值为root指令或alias指令的指令参数$fastcgi_script_name- Nginx 的内置变量,表示当前请求中 URI 中被匹配为 PHP(或其他 FastCGI)脚本的那部分路径,用于告诉 PHP 应该执行哪个文件
fastcgi_param SCRIPT_FILENAME $document_root$fastcgi_script_name; 这条指令的含义:
- 取 Nginx 的网页根目录($document_root,如 /var/html/tests)
- 拼接上请求的脚本路径($fastcgi_script_name,如 index.php)
- 将结果
/var/html/tests/index.php赋值给 FastCGI 参数SCRIPT_FILENAME - PHP-FPM 通过 FastCGI 协议接收来自 Nginx 的文件路径字符串,在本地文件系统中查找 /var/html/tests/index.php 文件并执行该文件
启动 Nginx
Shell > usr/local/nginx/sbin/nginx -t
nginx: the configuration file /usr/local/nginx/conf/nginx.conf syntax is ok
nginx: configuration file /usr/local/nginx/conf/nginx.conf test is successful

Shell > ss -tulnp
Netid         State          Recv-Q         Send-Q                                       Local Address:Port                   Peer Address:Port         Process
udp           UNCONN         0              0                                                127.0.0.1:323                         0.0.0.0:*             users:(("chronyd",pid=779,fd=5))
udp           UNCONN         0              0                                                    [::1]:323                            [::]:*             users:(("chronyd",pid=779,fd=6))
udp           UNCONN         0              0                        [fe80::20c:29ff:feb3:41fd]%ens160:546                            [::]:*             users:(("NetworkManager",pid=774,fd=24))
tcp           LISTEN         0              128                                                0.0.0.0:22                          0.0.0.0:*             users:(("sshd",pid=795,fd=3))
tcp           LISTEN         0              511                                         192.168.100.20:80                          0.0.0.0:*             users:(("nginx",pid=5947,fd=6),("nginx",pid=5946,fd=6),("nginx",pid=5945,fd=6))
tcp           LISTEN         0              128                                                   [::]:22                             [::]:*             users:(("sshd",pid=795,fd=4))
关联
在 Nginx 服务器上:
Shell > vim /var/html/tests/index.php
<?php
phpinfo();
?>
在 PHP 服务器上:
Shell > vim /var/html/tests/index.php
<?php
phpinfo();
?>
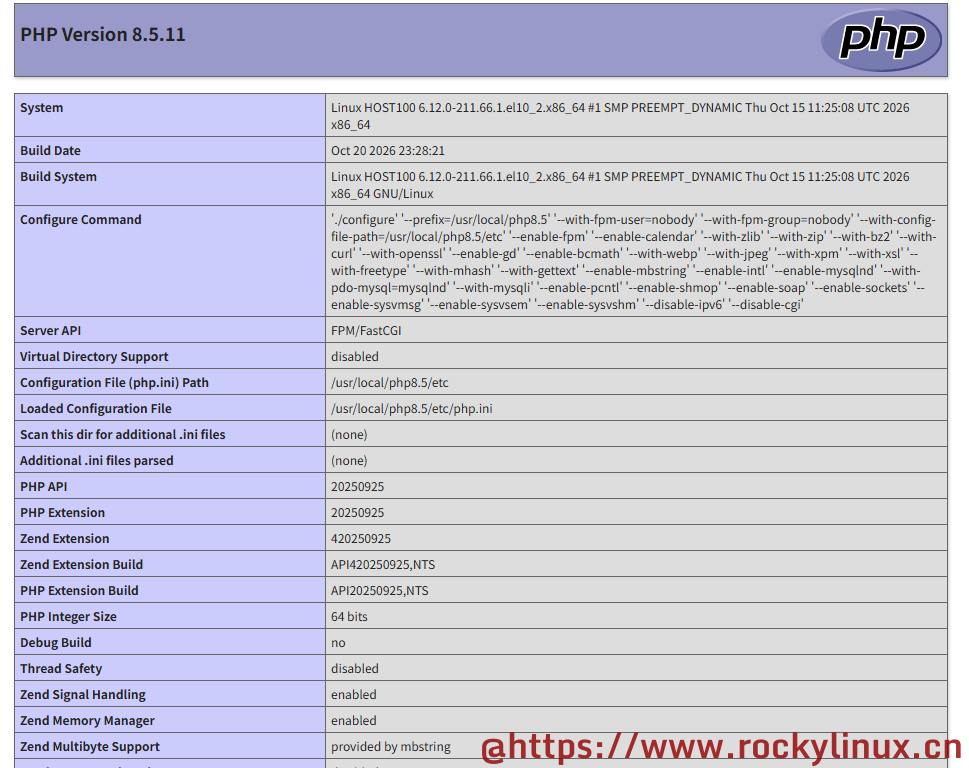
在浏览器上访问 http://192.168.100.20 则会出现这样的一个页面:
注意事项
-
两台机器的文件必须保持一致且同步
- Nginx(192.168.100.20/24) - 负责存储静态文件和 PHP 源代码
- PHP(192.168.100.21/24)- 负责执行代码。通过 FastCGI 协议接收来自 Nginx 的文件路径字符串并在本地文件系统中寻找对应文件
由于 Nginx 和 PHP 在不同的机器上且分工不同,导致了两台机器的文件必须保持一致且同步,您可以通过相关工具(如 rsync)完成机器之间的文件同步。
若 Nginx 服务器上有/var/html/tests/index.php文件,则 PHP 服务器上也必须有/var/html/tests/index.php文件。 -
权限一致性
若 Nginx 的进程使用
nginx用户运行,除了 PHP 的 php-fpm 应该以nginx用户运行外,关联文件的文件所有者和所属组也应该设置为nginx用户和用户组